


Tournament Guide for Stores
From creating the event to the final result, in 19 steps. The screenshots are from a phone; it works the same on a computer. While you run the event, the i next to its status on the Manage page opens just the steps for that moment.
You need a shop account that an admin has approved. Register Your Shop →
Open the Tournaments page
monsnatch.com/tournament, or the Game → Tournaments menu
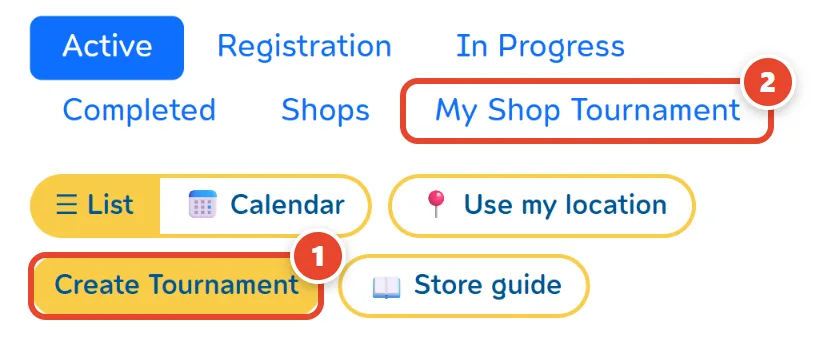
Tap Create Tournament
The button appears once you sign in with your shop account.
The My Shop Tournament tab
Every event your shop has created — waiting for approval, running and finished. Use it to find your events again.
No shop account yet?
Apply at monsnatch.com/store-owner/register and wait for an admin to approve it.
General information
Cover photo · name · description · or start from an earlier event
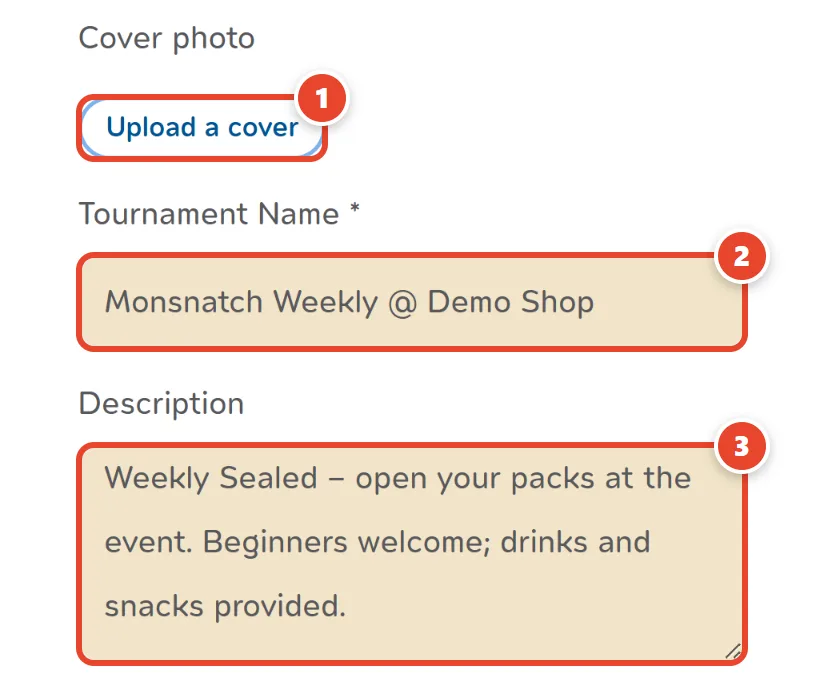
Cover photo
JPG / PNG / WebP up to 5 MB. Leave it empty and Monsnatch's standard image is used.
Tournament Name *
3–200 characters. Put your shop's name in it, e.g. “Monsnatch Weekly @ Your Shop”.
Description
House rules, entry fee, what you have prepared, anything players should know (up to 1,000 characters). Rude words are refused in any text players read (name, description, prizes, venue): the form says which word to change.
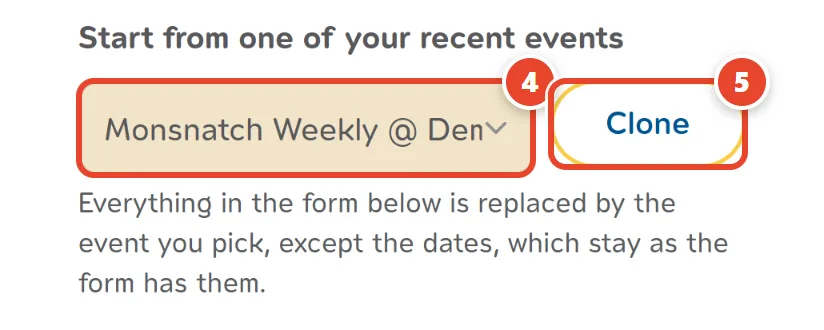
Start from one of your recent events
The quick way for an event you run every week: pick one of your shop's 10 latest events. Each shows its match day after the name, since weekly events often share one.
Clone
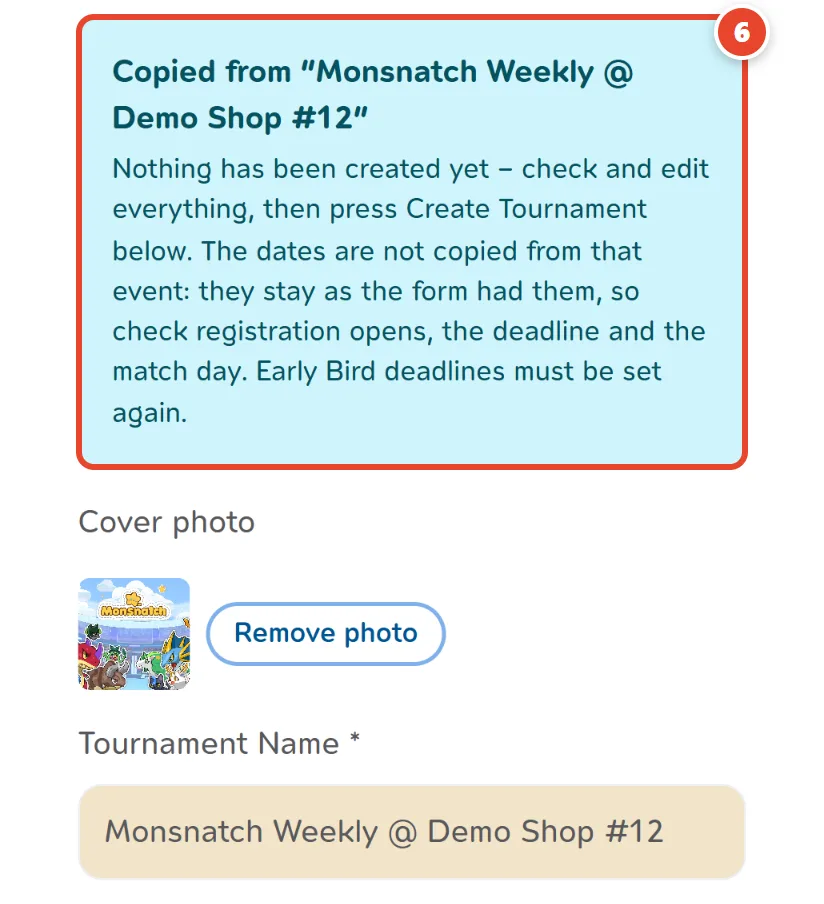
Everything in the form is replaced by the event you picked, even what you have already typed — except the dates: registration opens, the deadline and the match day stay as the form has them (step 4). Early Bird deadlines must be set again. Nothing is created until you press Create Tournament.
Copied — check before you create
The banner says which event it came from. Check the name, prizes and venue, change what differs from last time, and pick the event type again at the end of the form (step 7).
Format
Format · pairing · number of players
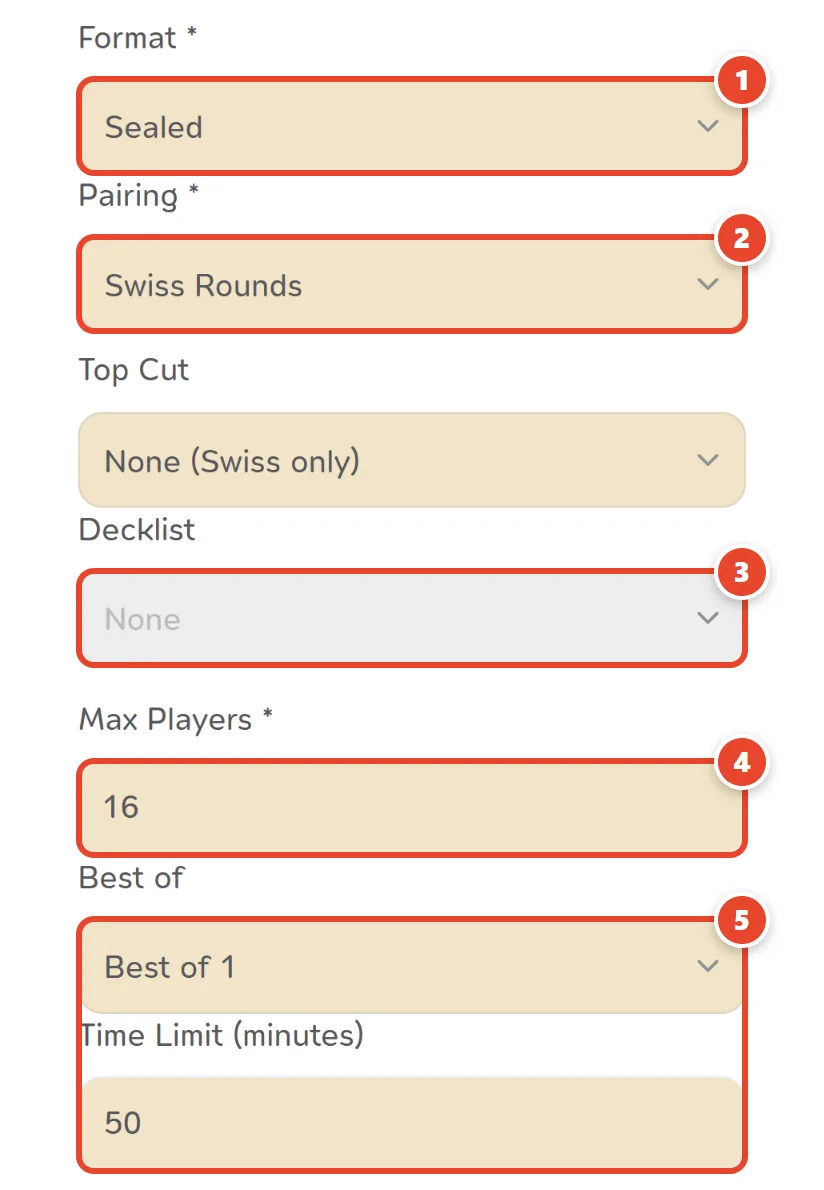
Format
Constructed / Draft / Sealed
Pairing
Swiss Rounds (everyone plays every round) or Single Elimination. Swiss can end in a Top Cut (step 15). The pairing cannot change once play has started. Fewer than 4 players at the start: the event plays a Round Robin instead and counts for no PP or ELO.
Decklist
Constructed only (1–3 decks). For Draft / Sealed it is locked to “None”.
Max Players *
4–256 players (default 16).
Best of / Time Limit (minutes)
Best of 1 / 3 / 5, and the time per match in minutes (default 50).
Dates and times
Important — the switch and the three dates do different jobs
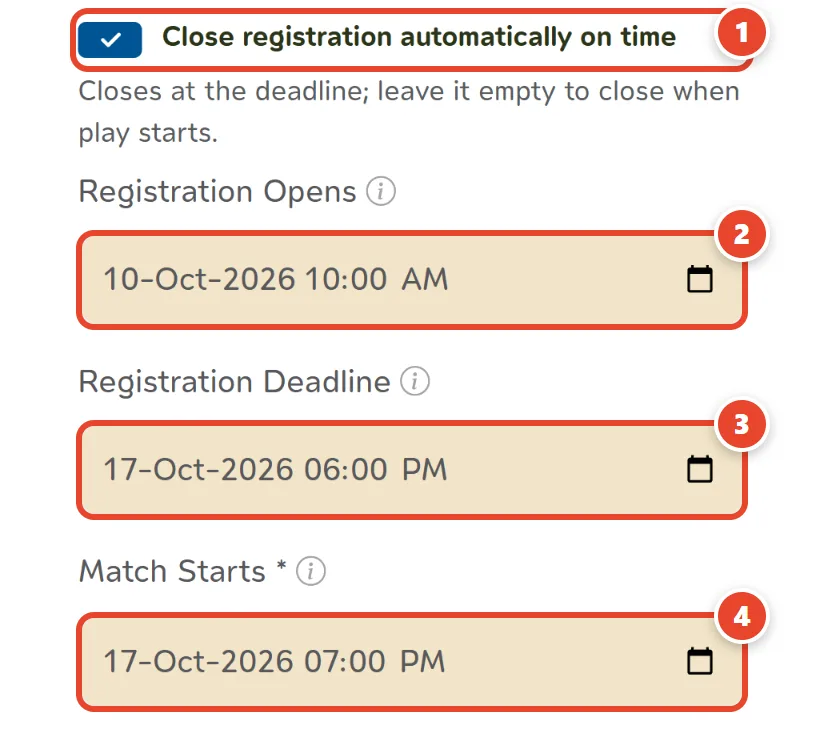
Close registration automatically on time
On (the default): registration closes by itself at Registration Deadline, or when play starts if you leave that empty. Off: there is no deadline — players can still sign up, and you can still check them in, after the start time until you press Close registration yourself. Good for events that take walk-ins.
Registration Opens = when players can first sign up
Players can sign up from this moment. Before it, the page shows when registration opens.
Registration Deadline
Nobody can sign up after this. Left empty, registration closes when play starts. Only there while the switch (1) is on.
Match Starts
When round 1 is called. It must be in the future and after the registration deadline. Players are reminded of it.
Example
Opens 10 Oct 10:00 · closes 17 Oct 18:00 · play 17 Oct 19:00 · Taking walk-ins? Turn the switch (1) off and set only the opening and the match start.
Venue
Leave it empty if the event is at your shop
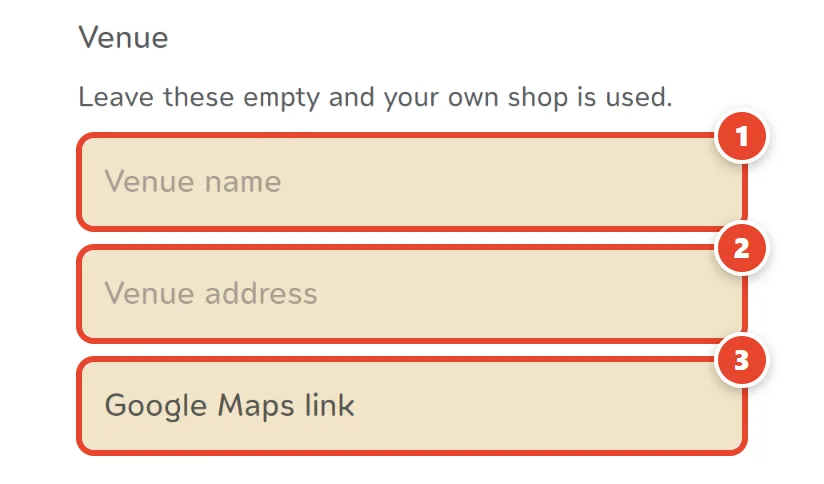
At your own shop
Leave all three fields empty. Your shop's name, address and map link are filled in automatically.
Venue name
Fill it in when the event is somewhere else, such as a mall or a hall.
Venue address
The address players travel to.
Google Maps link
Paste a Google Maps share link so players can tap to navigate.
Prizes & Lucky Draw
Players see these on the event page
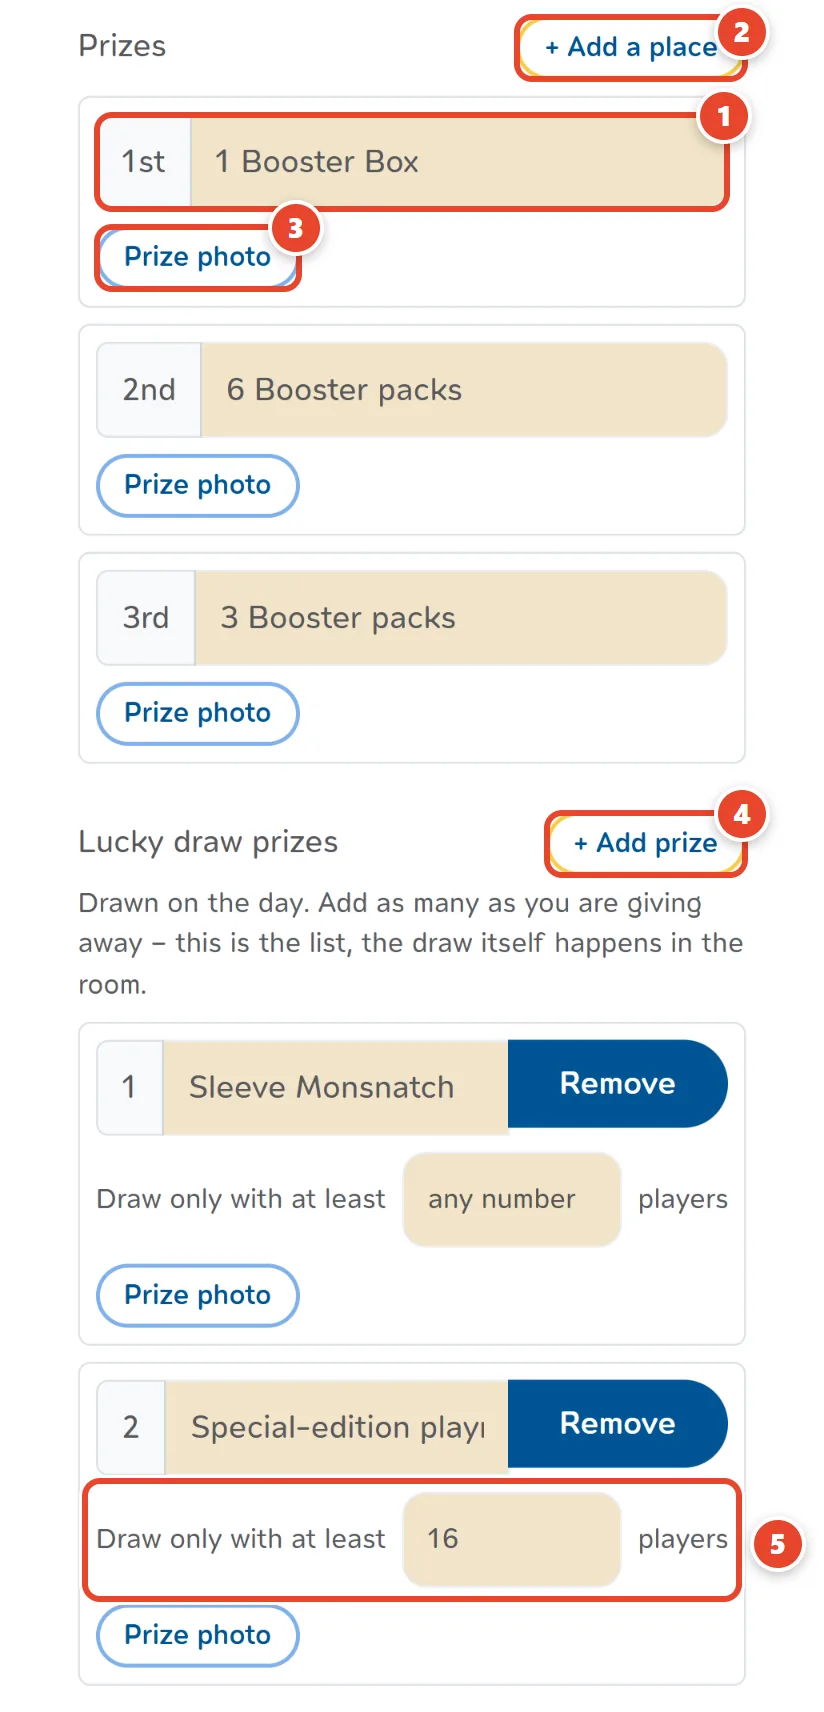
Prizes for places 1–3
Type the prize for each place. A place left empty is not shown.
+ Add a place
Add places 4, 5, … as many as you like.
Prize photos
Every place can have a photo (up to 5 MB).
Lucky draw prizes
List the lucky draw prizes — the draw itself happens on the day, from the Manage page.
Draw only with at least … players
Optional, for each prize. Left empty, it can be drawn however many come. With a number, say 16, the draw refuses it until 16 players are at the event — for a big prize you only give with a full room.
Options, event type, then create
Self-reporting · Early Bird · Event type
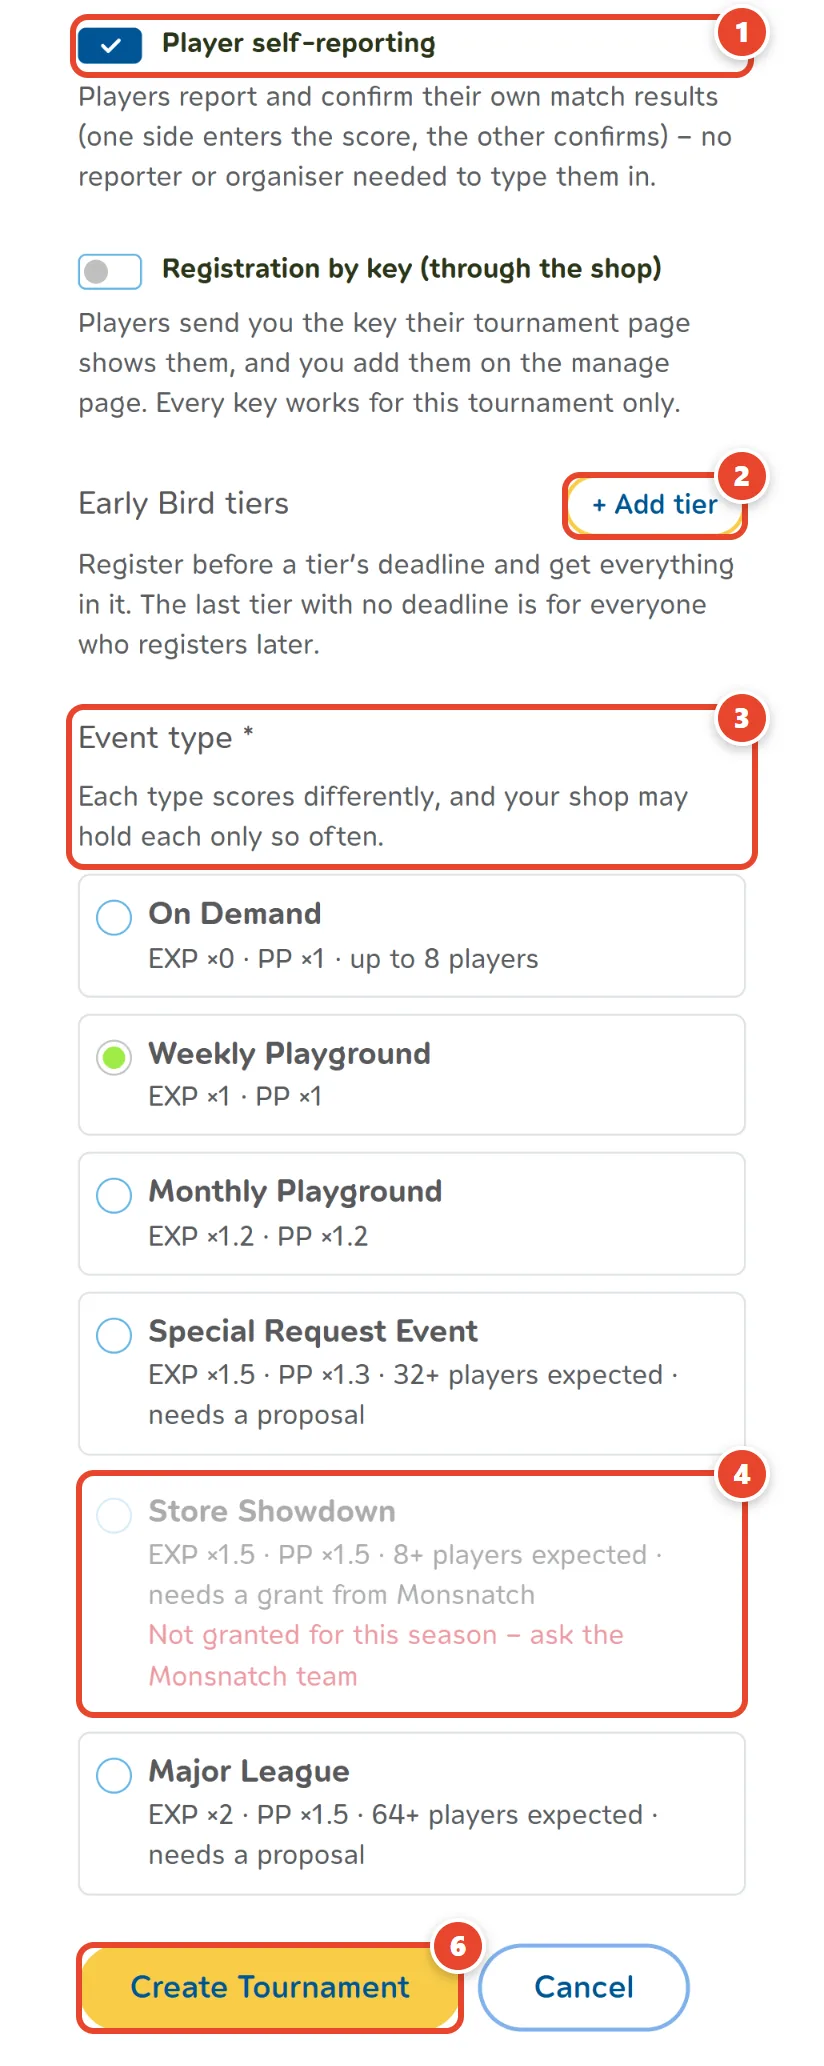
Player self-reporting
One player enters the result and the other confirms it, so the shop does not type every result. If they disagree, the shop can always enter it.
Early Bird tiers
A bonus for players who sign up before a set time (optional).
Event type
Shops only, at the end of the form. Set the match day (step 4) first; then the types appear, each with the EXP ×n · PP ×n players earn. Weekly Playground is picked by default. It can't be changed later (the edit page has no picker), and every event still goes to review.
How often each type
On Demand: no limit, any number of players · Weekly Playground: 1 a week (weeks start Tuesday 07:00 Thai time), at most 4 a month · Monthly Playground: 1 a month · Special Request Event: Saturday or Sunday, 1 a day · Store Showdown: 1 a season, only for shops Monsnatch has granted · Major League: needs a proposal · Counted by match day; cancelled or sent-back events don't count · On top of the running-at-once limit (tip 1).
A type you can't use right now
It is dimmed, with the reason in red: used this week (and the date it opens again), Saturday or Sunday only, not granted… Change the match day and the list is checked again at once.
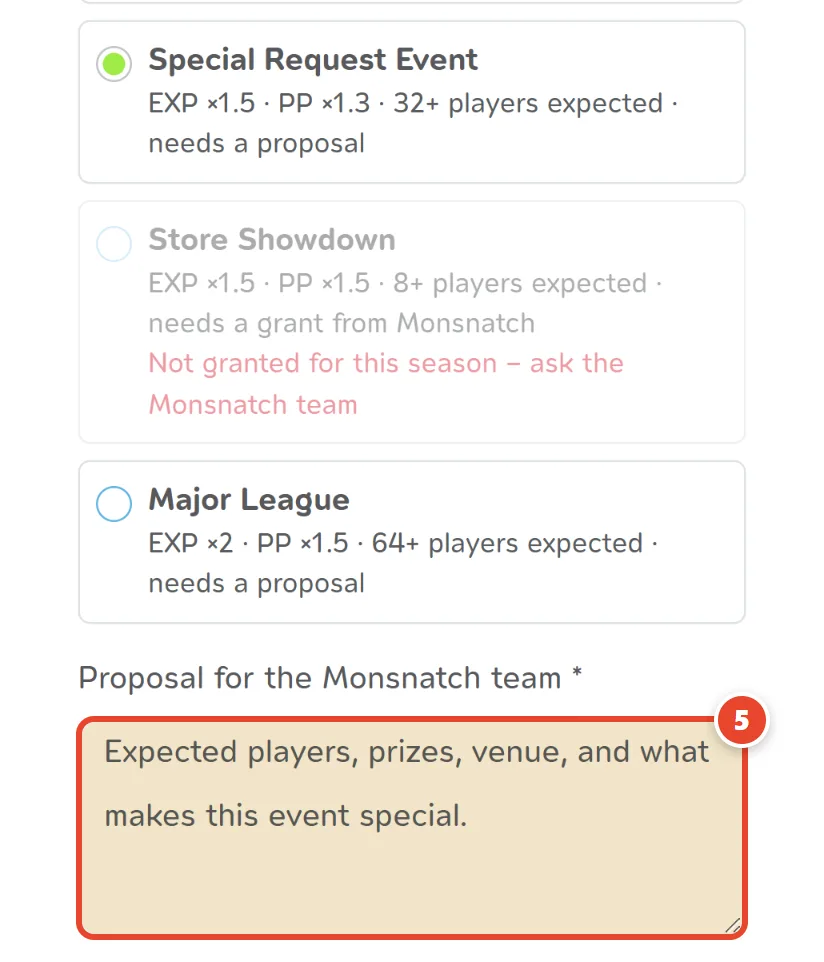
Proposal for the Monsnatch team
Special Request Event and Major League need this (up to 2,000 characters): expected players, prizes, venue, and what makes the event special. Picking On Demand caps Max Players at 8.
Tap Create Tournament
It is checked straight away: the AI reads the name, description and cover, and a clean event goes live within a few minutes. If it can't pass them, an admin looks first.
Waiting for review
Check the status with the event's Manage button
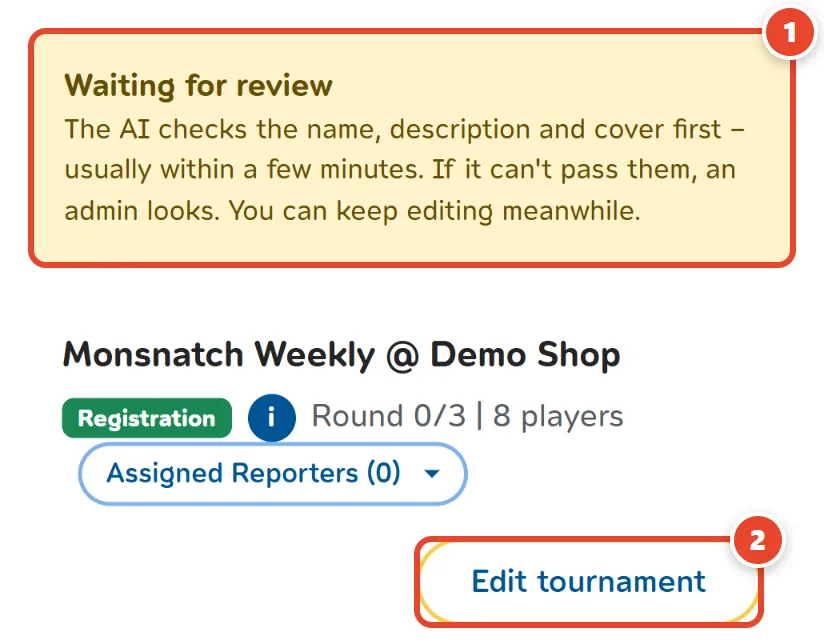
Waiting for review
Until it passes only your shop and the admins can see it. The event card carries the label Waiting for review — staff only. The AI usually finishes within a few minutes; one it can't pass waits for an admin.
You can edit while you wait
Tap Edit tournament, then save.
If it is sent back
You will see Sent back by an admin with the reason, and the same reason comes by email (and LINE, if your account is linked). Fix what it says and save — it goes back for review.
Once approved
The event goes live on the site, players can sign up, and it is announced on Discord automatically. You are told by email (and LINE, if linked).
If the event is cancelled
It stops taking entries and is not played, and it no longer counts toward the events you can run at once. Use ⋯ → Clone as new to set up a new one from it, or ⋯ → Delete to remove it.
Taking entry fees
Receiving payments · Store Showdown · checking slips · refunds
Receiving payments
On your Account page, under your shop: PromptPay (recommended: players get a QR with the exact fee), a QR image and/or a bank account. An admin checks every change before players see it; until then they keep paying to the approved details. The money goes straight to your shop.
Store Showdown
Needs approved payment details first. It is created as a paid event (the fee is fixed at ฿200, up to 32 players); you can switch it to pay-at-the-store. While WP entry is on, registering also takes 5 WP from the player, given back if they withdraw before the start, you decline them, or the event is cancelled — not for a no-show.
Verifying payment...
A new slip sends you a notification (on your phone if notifications are on, and on LINE if your account is linked). Open the event with Manage: check the money has really arrived in your banking app, then approve the entry — or decline it with a reason the player reads.
Refunds
When a paid player pulls out or you decline them, transfer the fee back yourself and attach the refund slip to their entry, so both sides have the record.
Store staff
Once, on your Account Settings page
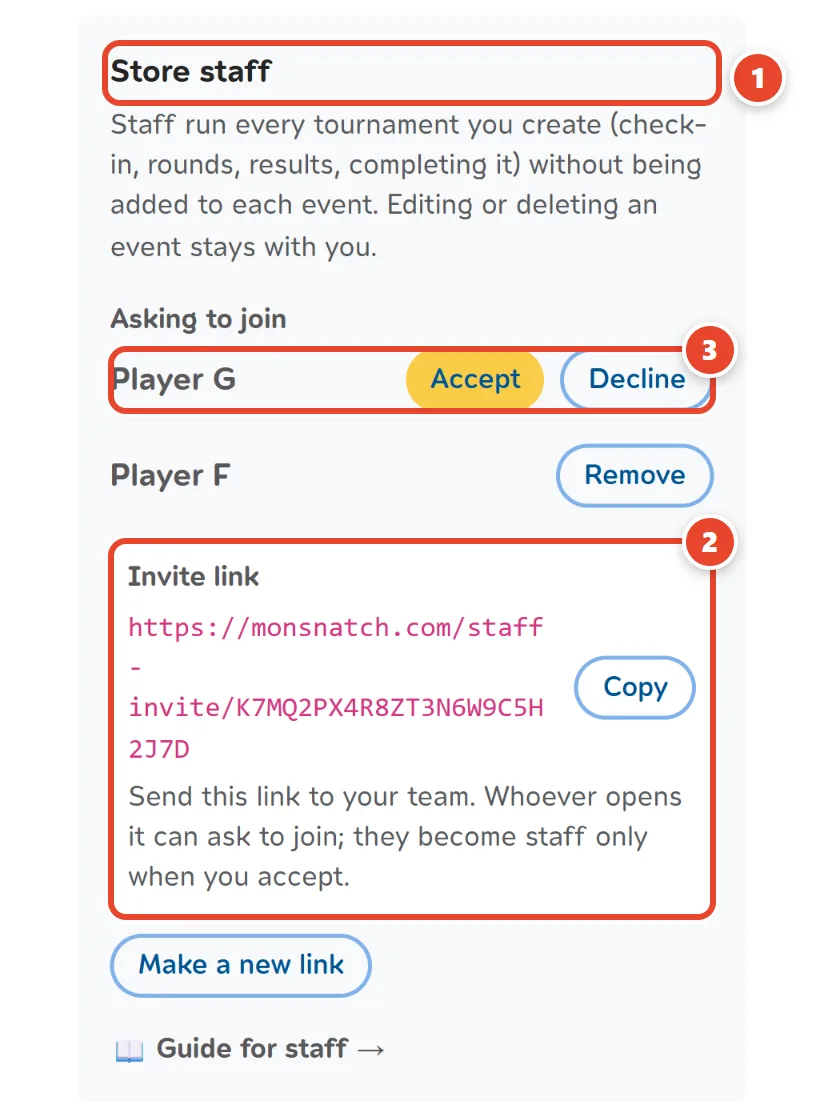
Store staff
On your account page, in the shop section. Staff run every event you create without being added to each one.
Invite link
Copy it and send it to your team. Whoever opens it can ask to join; you never need their name or ID. Make a new link stops the old link.
Accept or Decline
Asks show at the top of the card. Nobody is staff until you accept. Remove takes someone off later.
What staff can do
On every event at your shop: check-in, accepting or declining players, seats, starting and closing rounds, results, completing the event, the Lucky Draw. Only you: editing, copying or deleting an event, its reporters, reopening a finished event, and refunds.
Staff or a reporter?
Assigned Reporters are added per event and must be accounts an admin set up. Staff are invited once and cover every event. Send your team the staff guide: the link is on the card.
Register through the shop with keys
Optional · the shop decides who gets in
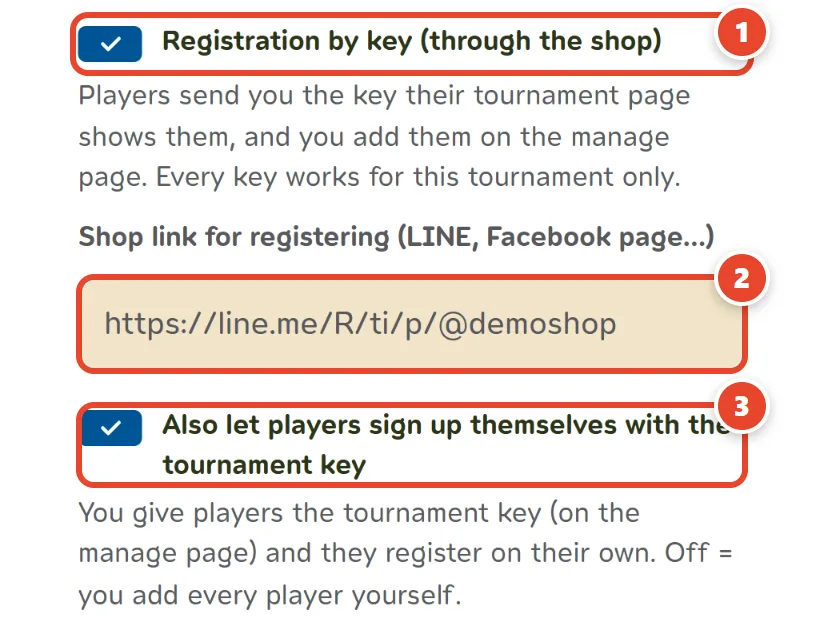
Registration by key (through the shop)
Turn it on when you create or edit the event. Players then cannot sign up by themselves: they send you their own key and you add them. Co-op (tag-team) events cannot use it.
Shop link for registering (LINE, Facebook page…) *
Your shop's LINE OA or Facebook page. The button on the event page takes players there to talk to you.
Also let players sign up themselves with the tournament key
Optional, off by default. On: you get a tournament key (no. 6) to hand out, and players who have it sign up themselves (no. 5). Off: you add every player yourself.
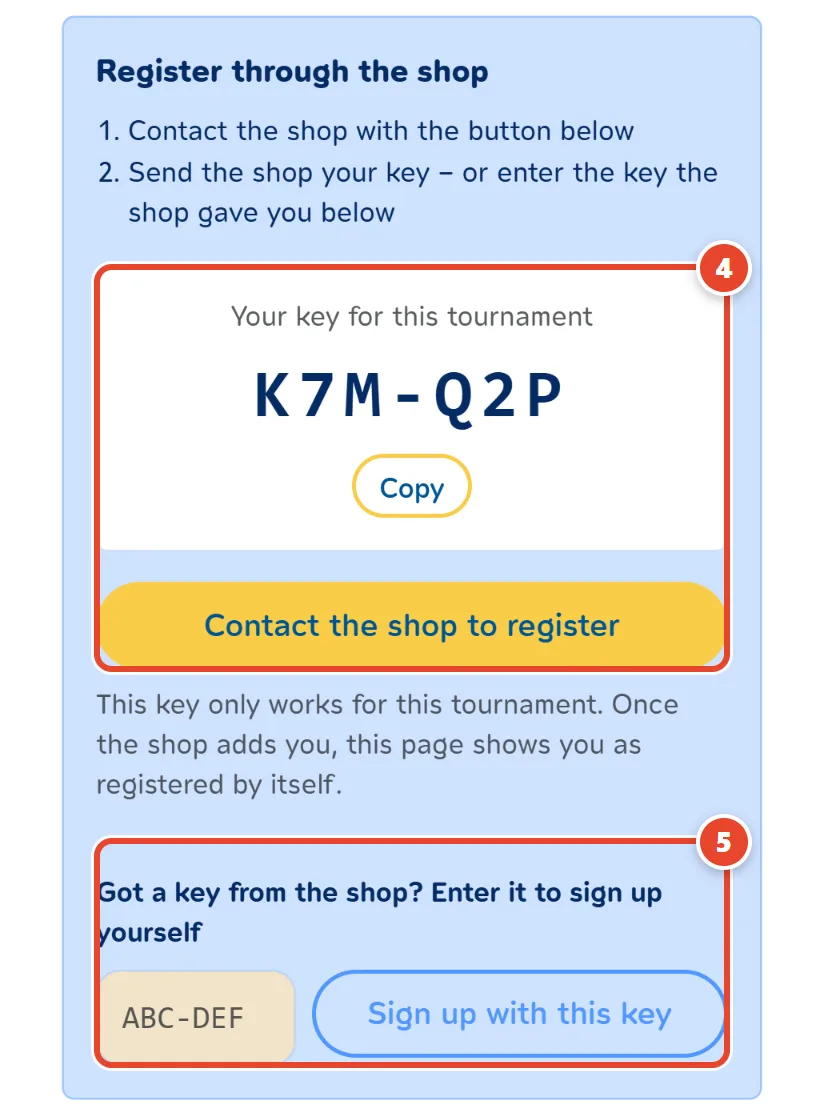
What players see: Your key for this tournament
Instead of the sign-up form, a signed-in player gets their own key for this event (e.g. K7M-Q2P) and the Contact the shop to register button.
Got a key from the shop? Enter it to sign up yourself
Only when no. 3 is on. A player with your tournament key types it here and taps Sign up with this key. The usual sign-up form opens — payment slip, terms and decks as normal.
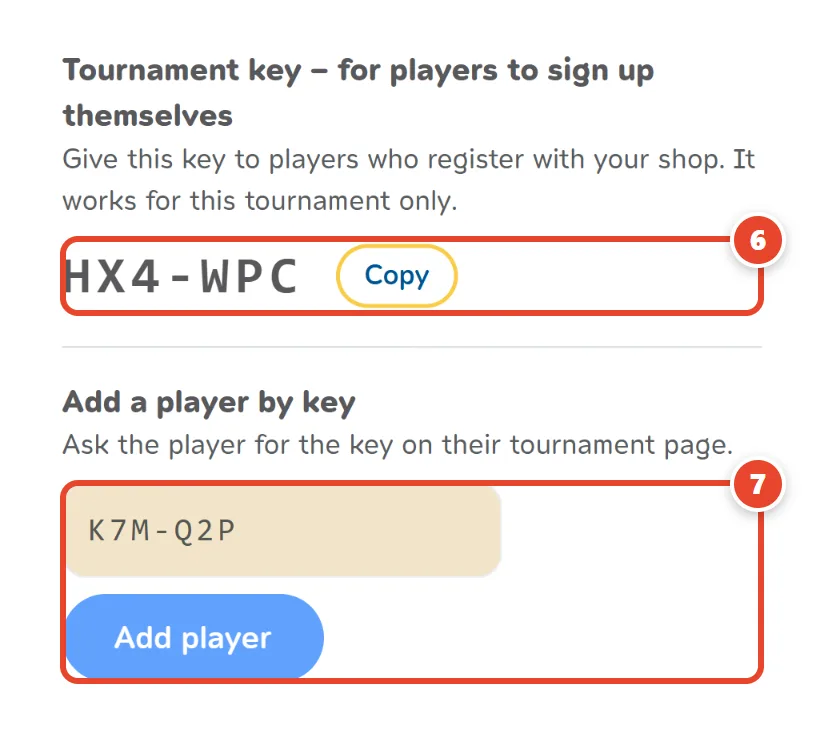
Tournament key — for players to sign up themselves
Only when no. 3 is on. At the top of the card on the Manage page. The system draws one for each event (you cannot choose it). Tap Copy and send it to players.
Add a player by key
A player sends you their own key (no. 4): type it in and tap Add player. You see the player's name, and their page turns to registered by itself.
Every key works for this event only
A key cannot be used for another event, and on such an event the shop adds players by key only.
Novice accounts for kids
On your Account Settings page, then on the event
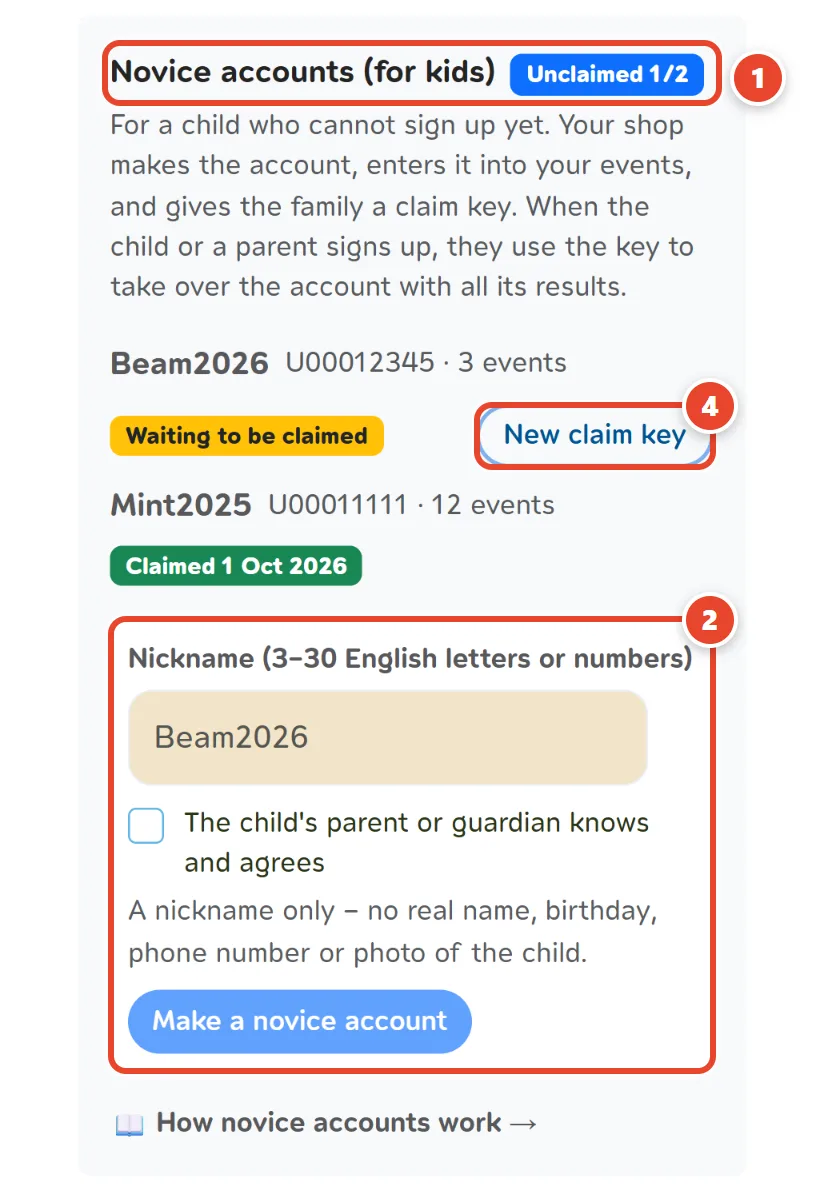
Novice accounts (for kids)
In the shop section of your account page. For a child with no email or login of their own. Your shop can hold 2 unclaimed at a time; each one claimed frees a place.
Make a novice account
A nickname only (English letters or numbers), and tick that the parent or guardian agrees. No real name, birthday, phone number or photo.
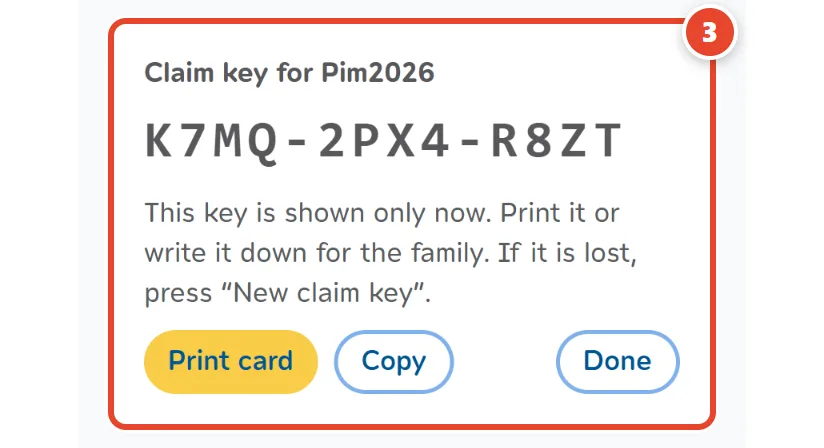
Print card
The claim key shows once, right after you make the account. Print the card or write the key down for the family. Lost? New claim key makes a new one and the old one stops working.
New claim key or Delete
Delete works only for an account never entered into an event. Once it has played, it stays until it is claimed.
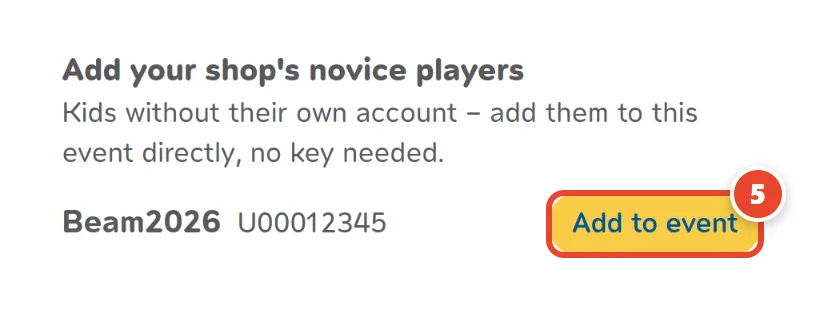
Add your shop's novice players
On the manage page of your own events, while registration or check-in is open. Press Add to event, no key needed. Results count for the account like any player's. Not for co-op events.
Claim a novice account
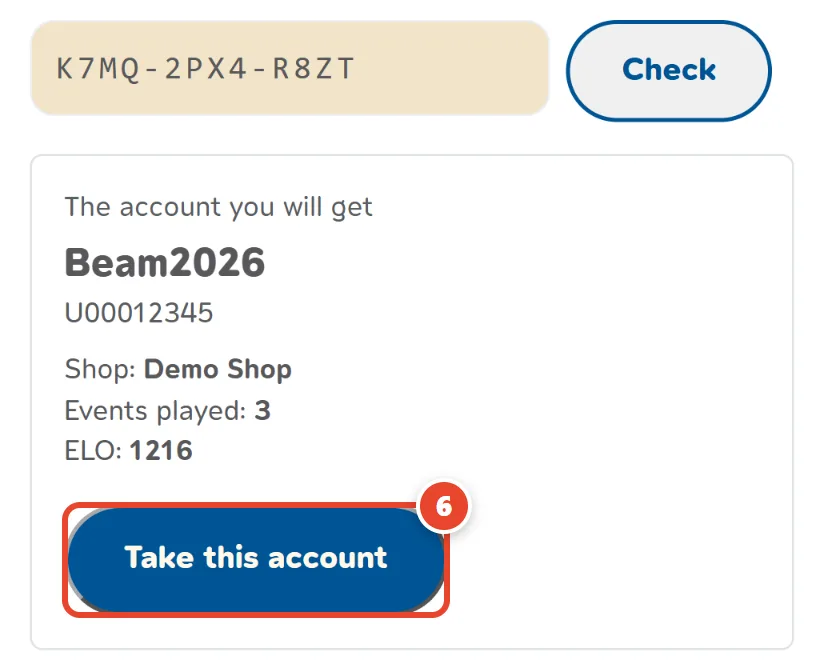
When the child or a parent can sign up: they sign up a NEW account, open the link on the card, type the key and press Take this account. The account, with all its events, points and rankings, is theirs.
Good to know
Until it is claimed, a novice account plays only at your shop. An account that has already played cannot claim: it must be a new one. Staff can add novices to events; only the owner makes, re-keys or deletes them.
Event day: check-in & start
On the event's Manage page

Close registration
Shown while registration is open. Tap it when entries are done or on the day: the event moves to check-in and waits for you to start. To start straight away and skip check-in, use ⋯ → Start · pair round 1. If Close registration automatically on time is off, the system never closes it for you — press this yourself.
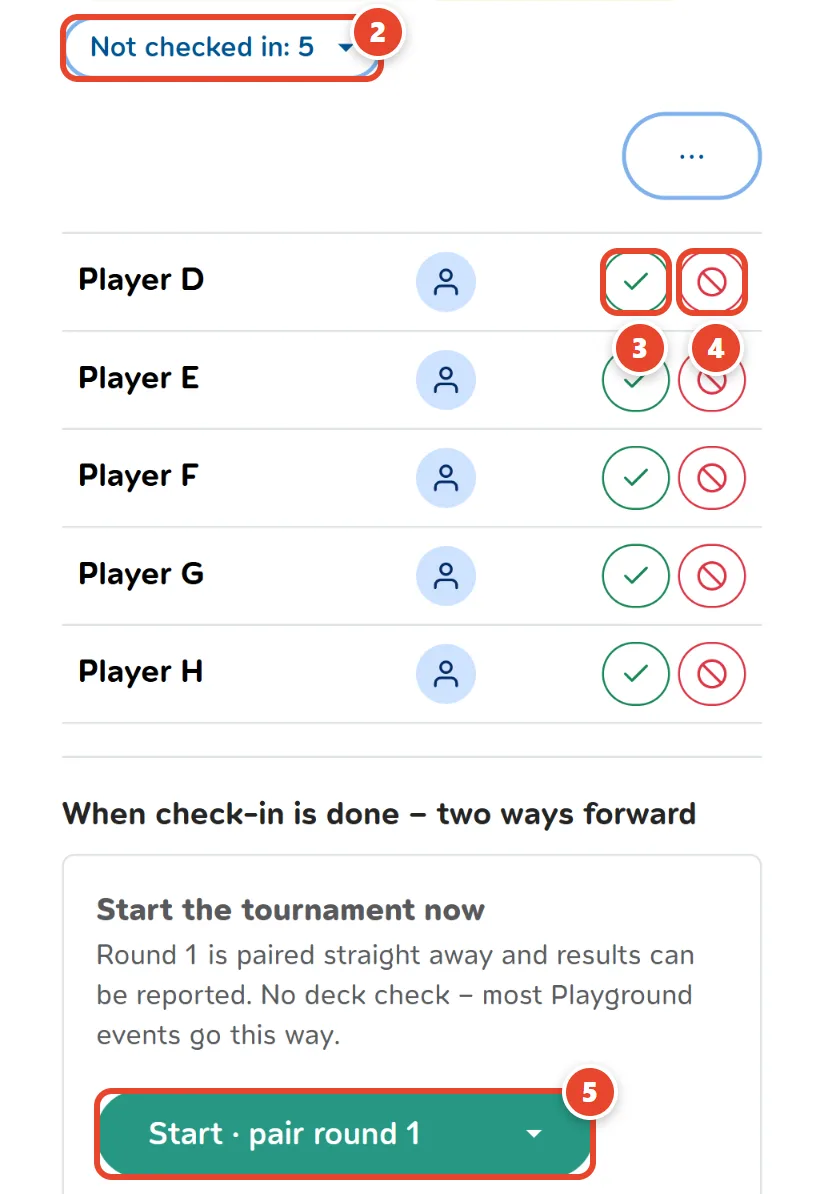
Not checked in: N
During check-in, tap it to list who has not arrived yet (it goes away once everyone is in).
Tap Check in
Do it for each player who arrives; they leave this list. Once anyone is checked in, only checked-in players are paired. The entry list below works too.
Decline
Available before the start. A reason is required, and the player sees it.
Start · pair round 1
Round 1 is paired immediately (at least 2 players; under 4 it plays as an unranked Round Robin). Use the arrow to Schedule instead. Sealed / Draft events: the page lets you choose — start now, or seat players to register decks first (steps 11–12). No deck check (most Playground events)? Just start.
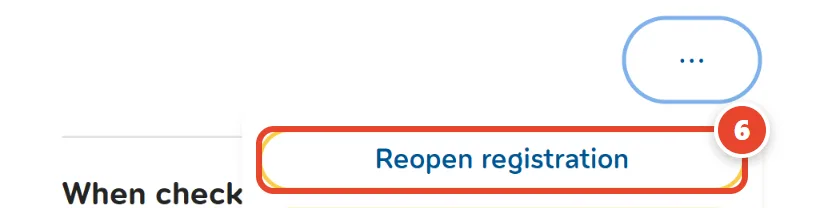
⋯ → Reopen registration
Closed it by mistake? Open it again — no need to ask an admin. The ⋯ menu also has Edit tournament and Clone as new.
Registration closed, but someone still wants in?
Until you start, you can take them: Edit tournament (in ⋯ during check-in) → turn Close registration automatically on time off, or set Registration Deadline later (no later than match day), and save — it applies at once, no admin needed. If you pressed Close registration, also tap ⋯ → Reopen registration. Then the player signs up, or you add them (a shop adding a player follows the same rule). Once the event has started, nobody can join.
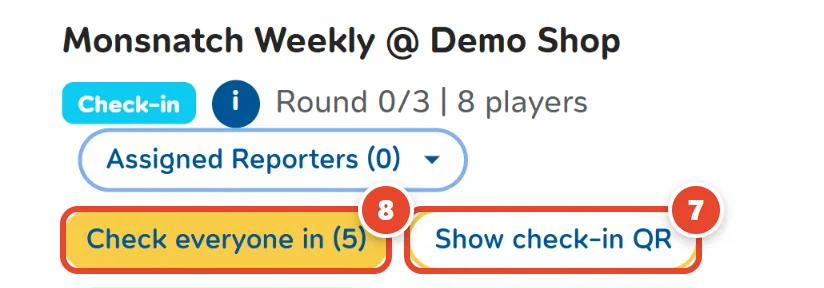
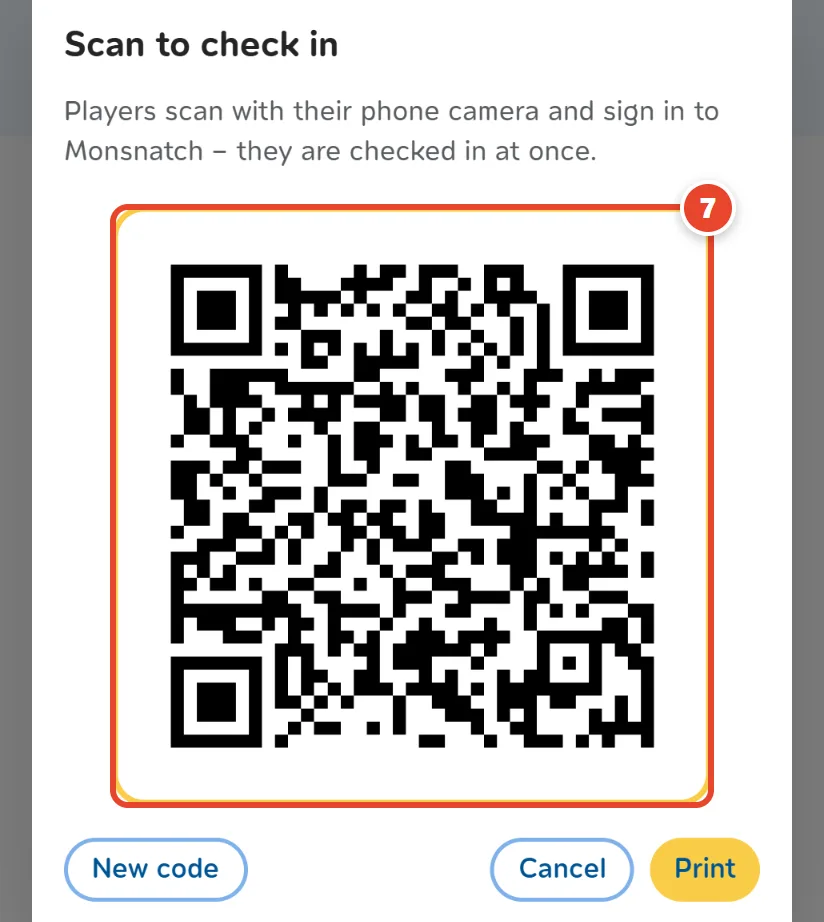
Show check-in QR
Before the start, open the QR players scan with their phone camera to check themselves in. Leave it on screen, or press Print and put it on the desk. If the QR gets out, "New code" makes the old one stop working. Players can also check in by location within 200 m of the shop, from 1 hour before the start (your shop needs its map location).
Check everyone in (N)
Checks in every registered player at once, before the start, after a confirm. Players whose slip is still waiting are left out.
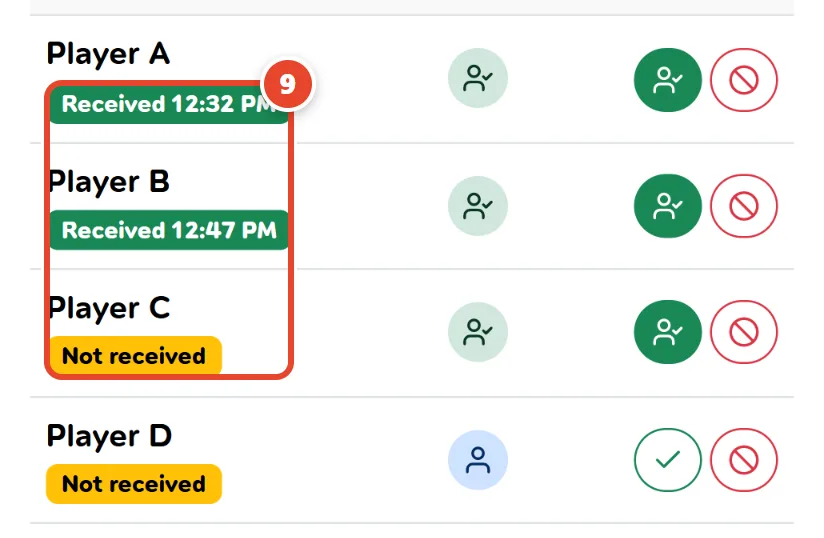
Door gift: received / not received
Each entry shows a received (with the time) or not-received badge. Players press "received" on their own phone in front of your staff, only once checked in. The shop cannot undo it; for a mistaken press the player contacts an admin.
Sealed: seat players for deck registration (optional)
Before Start · pair round 1 · Sealed / Draft events that check decks
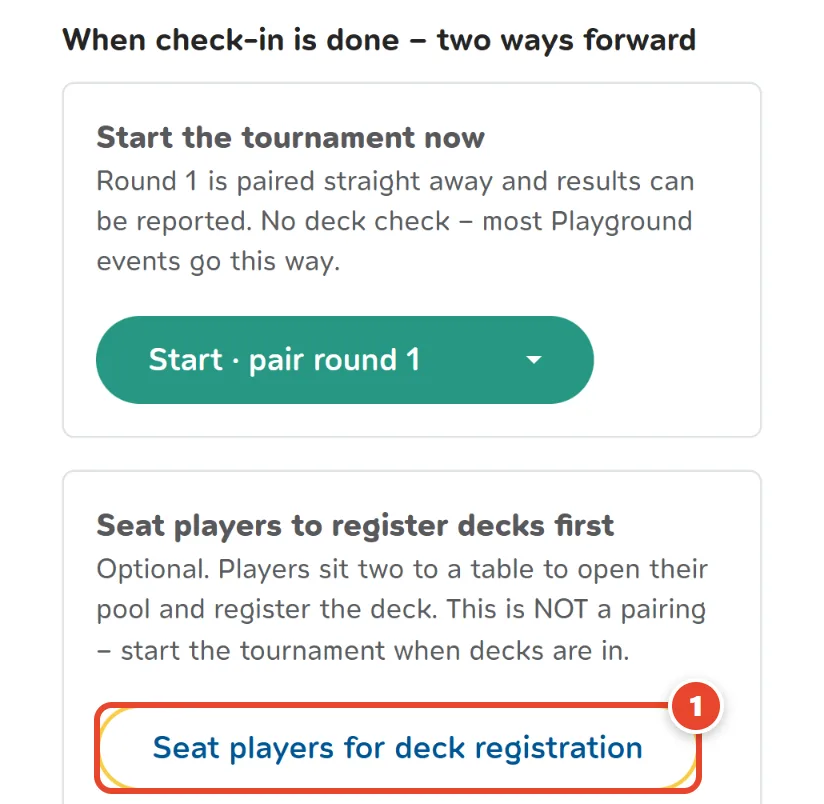
Seat players for deck registration
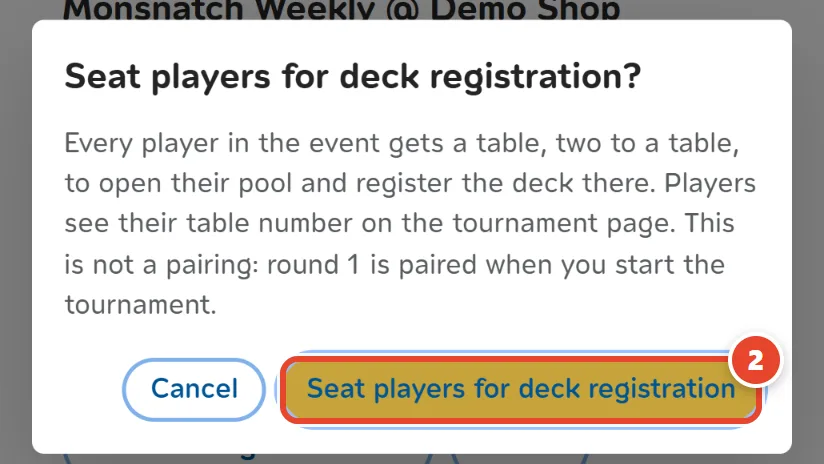
At check-in the manage page offers two ways: start the tournament now (no deck check, e.g. Playground) or seat players first. This button seats them at random, two to a table (with an odd number, the last one sits alone), to open packs and register decks. It is not a pairing — round 1 is paired when you start. You can also seat during registration.
Confirm
Each player sees their own table number on their phone straight away.
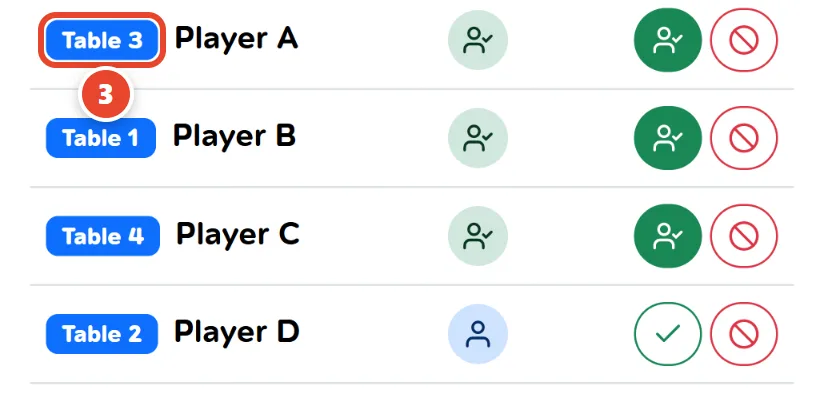
Table numbers in the list
Everyone gets a “Table N” label — use it to call out or point to seats.
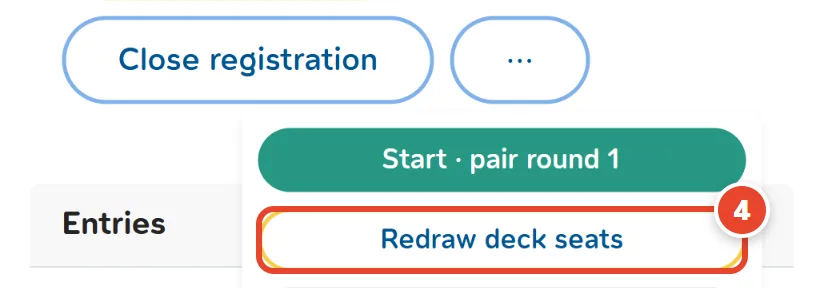
⋯ → Redraw deck seats
In the ⋯ menu: reseats everyone at random (everyone moves). Gone once you tap Start · pair round 1.
Players open packs & register decks
The My match page on the player's phone
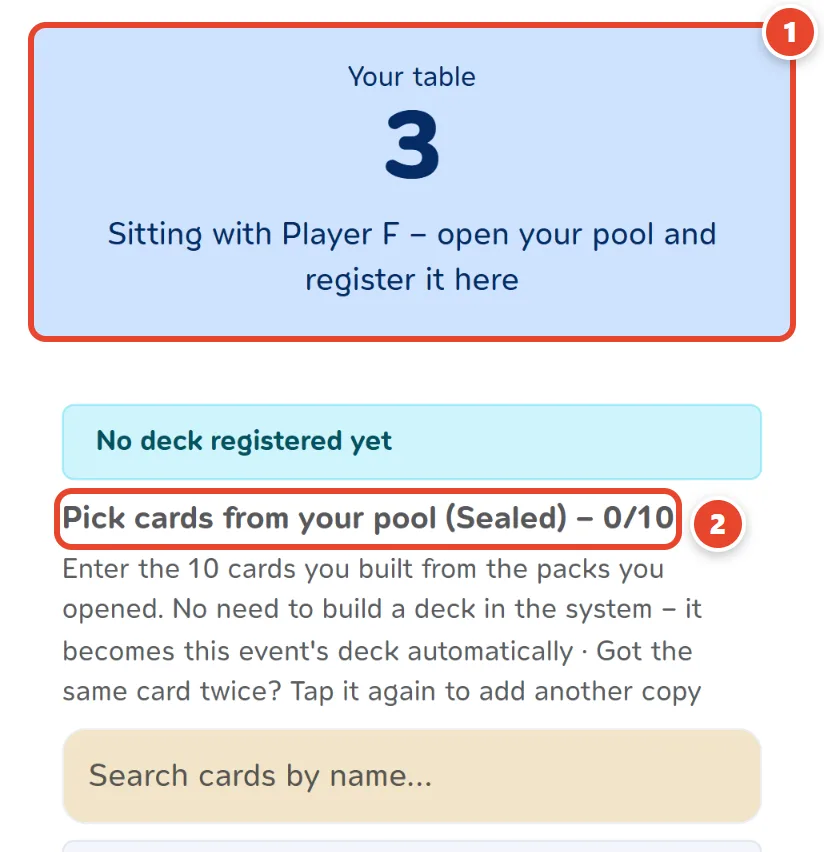
Your table
The player sees their table and who sits with them. The page refreshes itself every 10 seconds.
Register 10 cards
Open the packs at the table, pick the 10 cards and tap “Submit deck” — it must be done before the start (the pool is registered before round 1).
How players get here
The Your table button on the event page, or the account menu → My match.
Then the shop taps Start · pair round 1
Round 1 opponents are drawn fresh, separate from the deck-registration seats, and each player's page switches to their own match automatically.
Players report their own results
Show your players this before round 1 — on their own phones
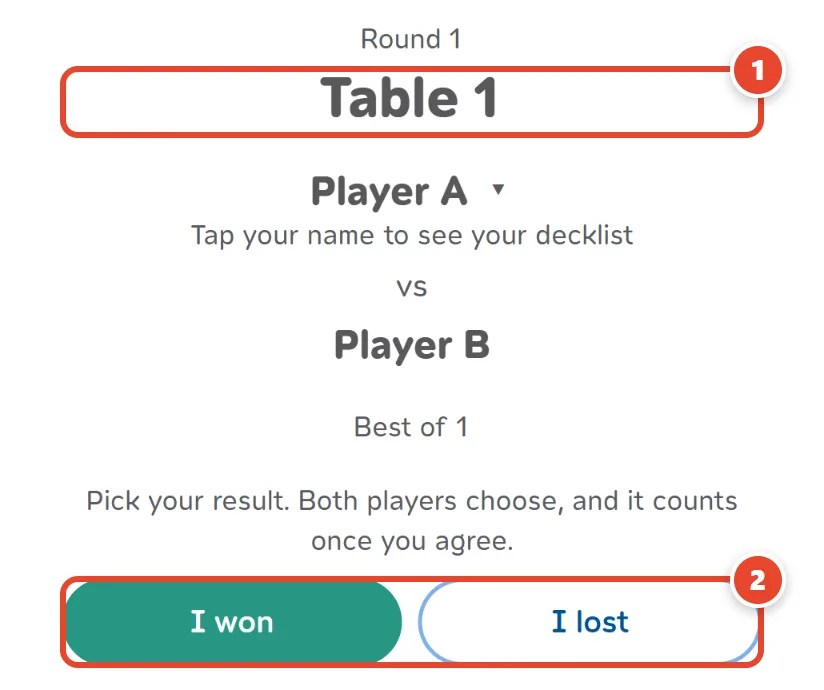
My match: table and opponent
Each player opens My match (the button on the event page, or the account menu) and walks to the table shown. The page refreshes itself every 10 seconds.
After the game: tap your result
Either player taps I won or I lost. In a best-of-three event they type the games won instead and tap Report result.
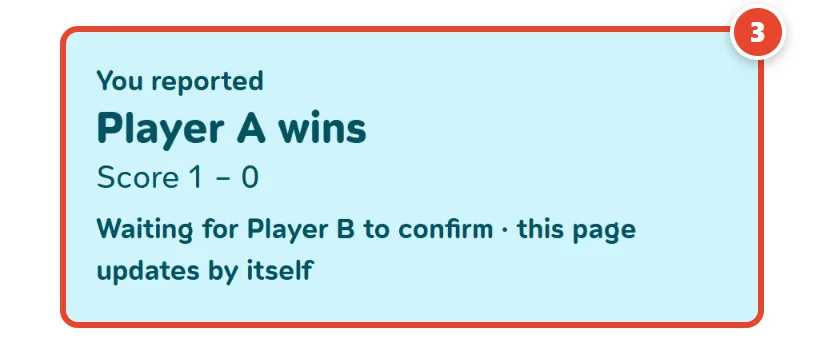
Waiting for the opponent
The result does not count yet: the screen says it is waiting for the opponent to agree.
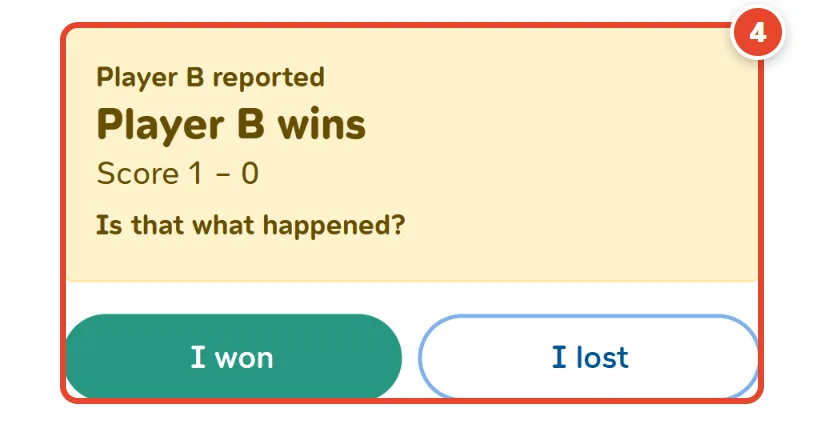
The opponent agrees
The other player sees what was sent and taps their own result. When the two agree it counts at once — also when both send the same result without waiting.
They don’t agree?
Then nothing is recorded and the table waits for you: on Manage you enter the right result yourself (next step).
Before round 1
Ask everyone to sign in with the account they registered with and keep My match open. Self-reporting is the Player self-reporting option when you create the event (step 7).
During play: results and next round
Repeat every round until the last one
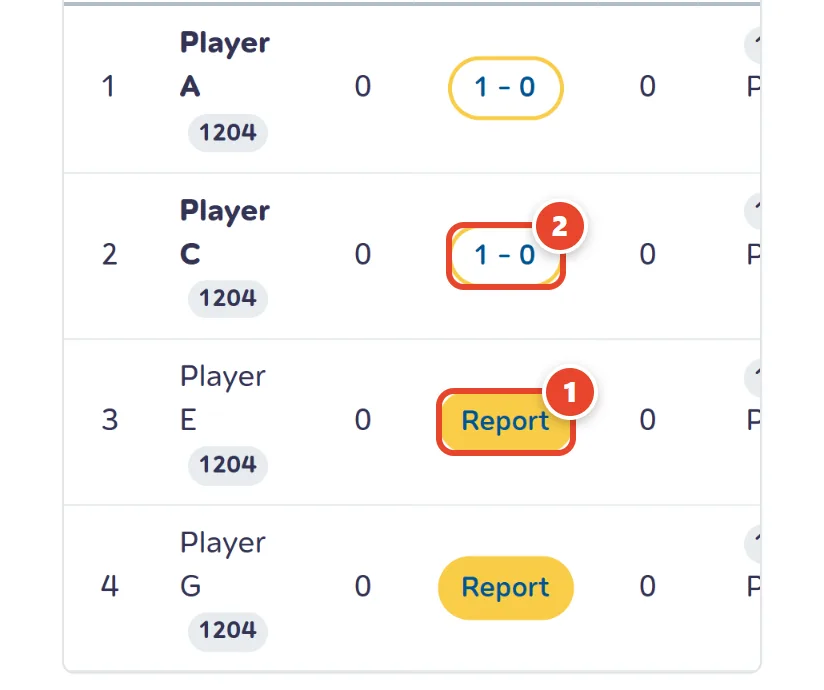
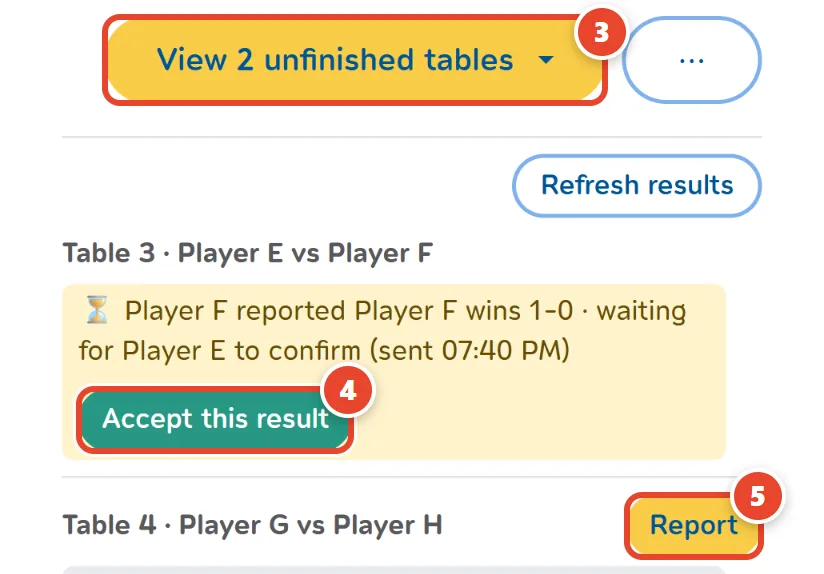
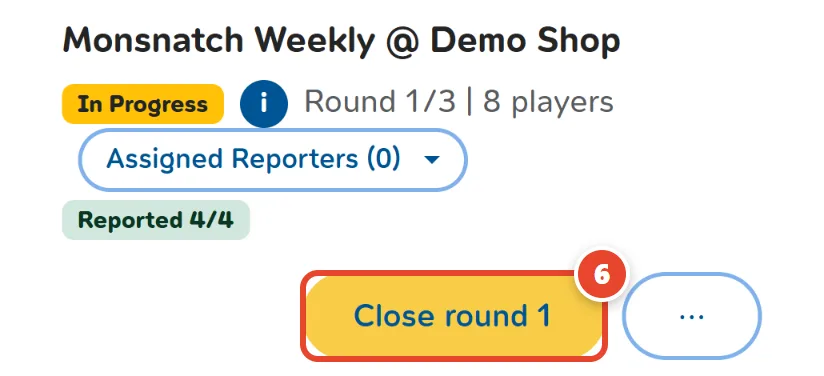
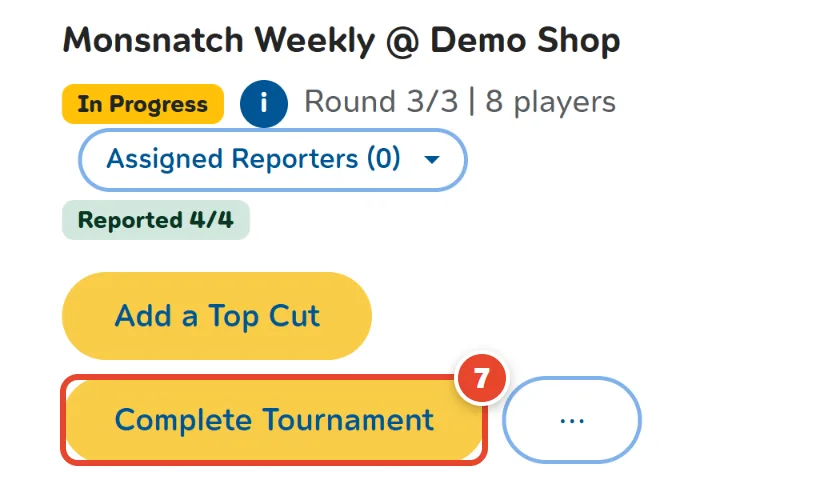
Report
Tap a table with no result, enter the score (or tick “Draw”) and send.
Fix a result
Tap a result that was already sent to change it.
View N unfinished tables
While a round is being played this is the main button: it lists every table still without a result, and where each one stands.
Accept this result
A player sent a result and the opponent has not confirmed it yet: accept it for them in one tap.
Report from the list
Nobody has reported, or the two players disagree: tap it and enter the right result.
Close round N
Replaces the tables button once every table has a result. Check the results, then close: players can no longer change this round (you still can), its standings are shown to everyone, and the break starts counting.
Complete Tournament
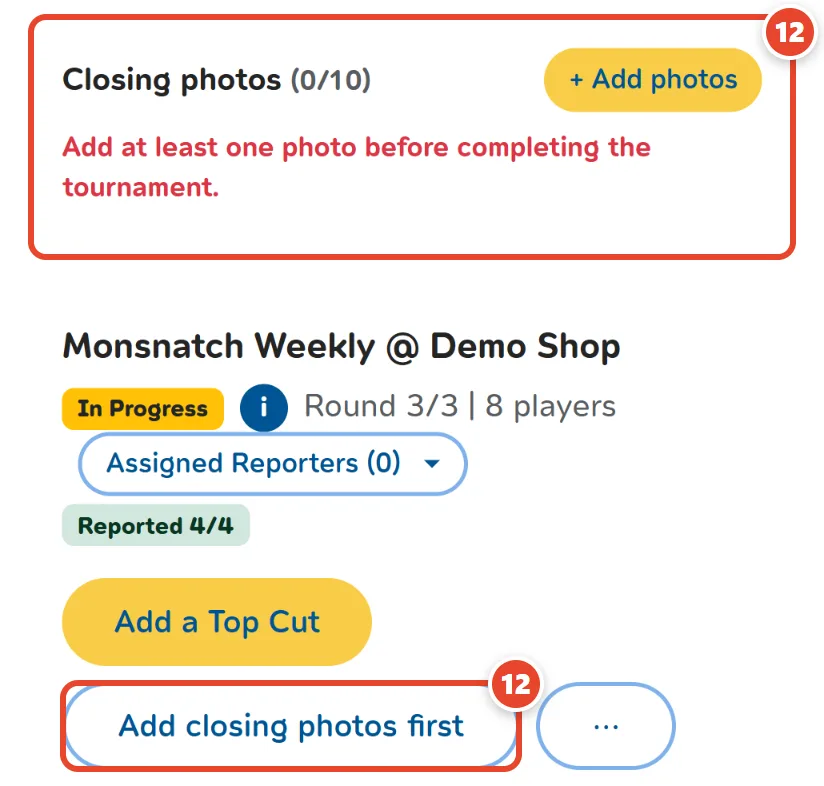
Shown only once every table of the last round has a result and the event has at least one closing photo (note 14). Standings are final and points are awarded.
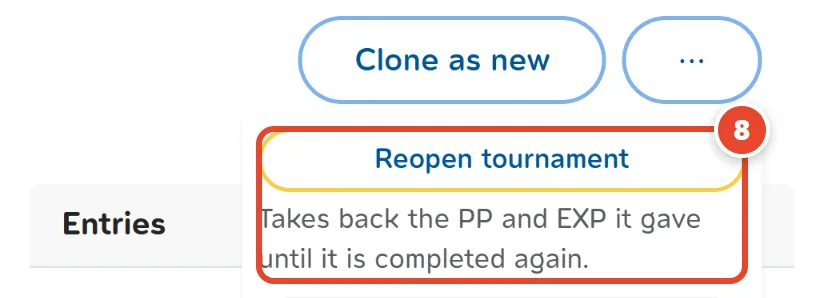
⋯ → Reopen tournament
Completed by mistake? Reopen it: it goes back to the same round, the points (PP / EXP) it gave are taken back, and completing it again gives them once. Not possible once the honors have been issued. Once completed, only the cover and description can be edited.
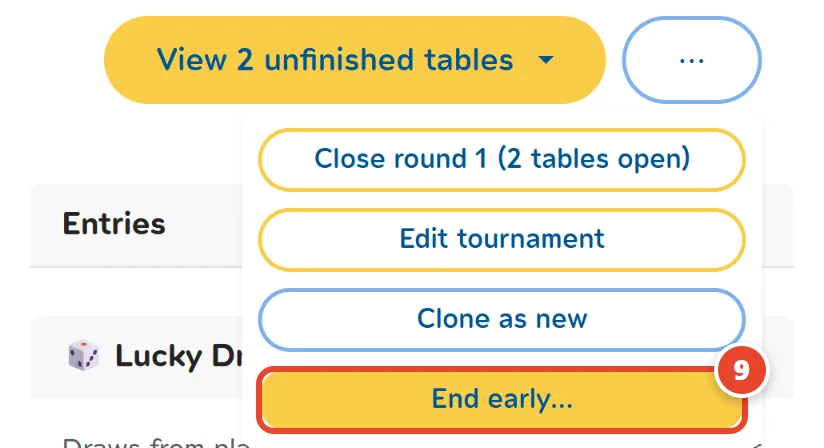
⋯ → End early…
Players went home, or the venue has to close? End it on the round it is on: write a reason (required, kept on record) and confirm. Final standings, points and PP are given out as they stand. Enter the results you know first — a table without one counts for nobody. Pressed it by mistake? Reopen it (note 8). During play the ⋯ menu also has Undo start (round 1 with no results only), Edit tournament and Clone as new.
Single elimination (no Swiss)
The whole bracket is drawn when you start and winners move on to their next table by themselves, so there is no Next Round Now. No draws — when time runs out, play a deciding game. Keep entering results until the final has one, then tap Complete Tournament. Players follow the bracket on the event page, Bracket tab.
Assigned Reporters
Let staff enter results: open this list under the event name, search a name and add it (only accounts an admin has made reporters show up). A reporter can open this event’s Manage page and enter or fix results, but cannot start rounds or complete the event.
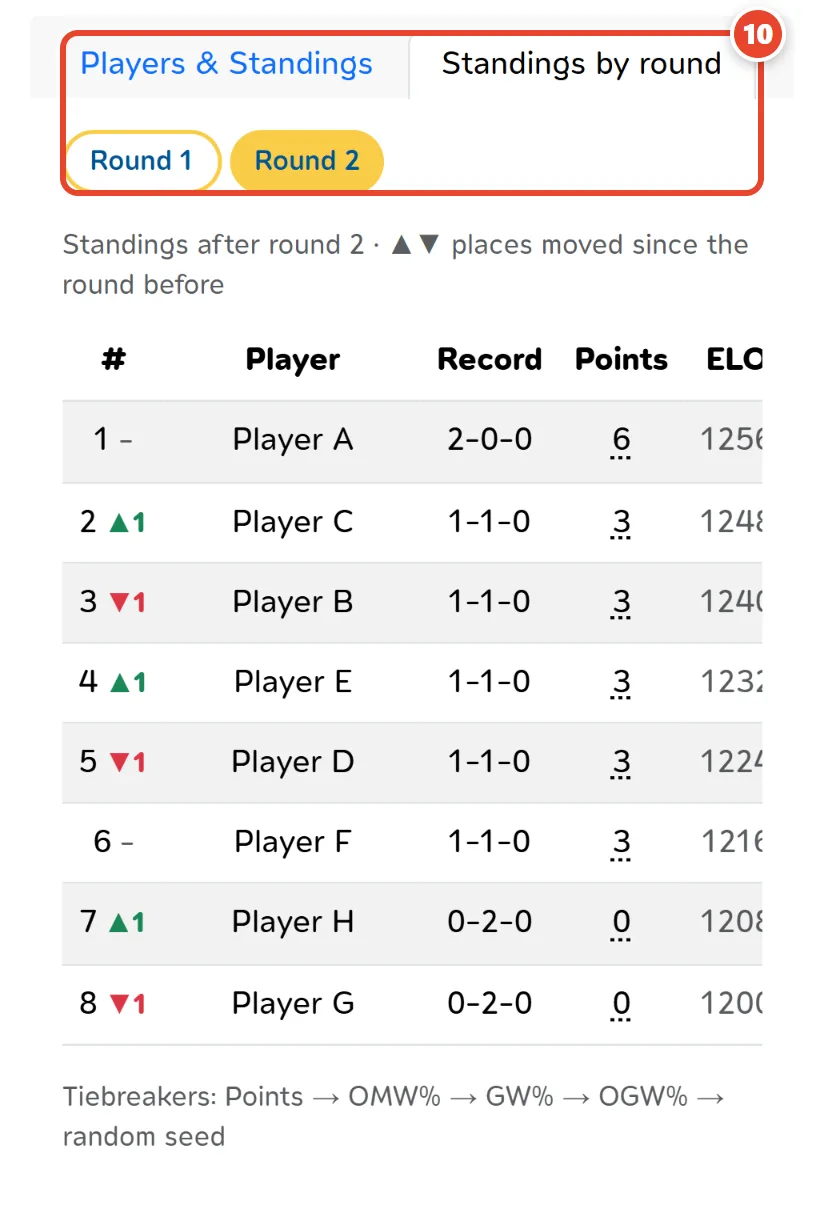
Standings by round
Once play has started, the players card has this tab: pick a round to see the standings as they were after it, with ▲▼ for places moved since the round before. Handy for announcing standings between rounds.
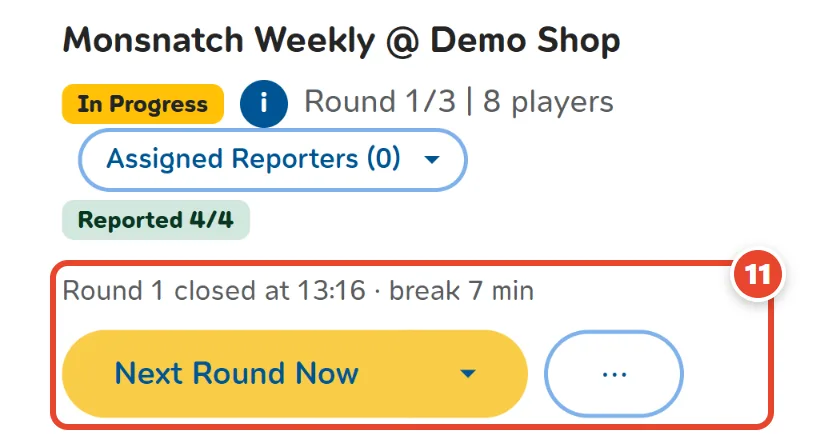
Next Round Now
Shown once the round is closed, beside when it closed and how long the break has been. Use the arrow to Schedule instead. Closed too early? ⋯ → Reopen round N, before the next round starts.
Closing photos
Before completing, the shop or its staff adds photos of the day in this card, in three kinds: the atmosphere of the event, a group photo of the players, and the prize winners holding their prizes — all three are needed (up to 4 of a kind, 10 in all). Until then the complete button reads Add all 3 kinds of photo before completing. The photos go to the Monsnatch team as proof the event was held, and show on the event page once an admin turns them on.
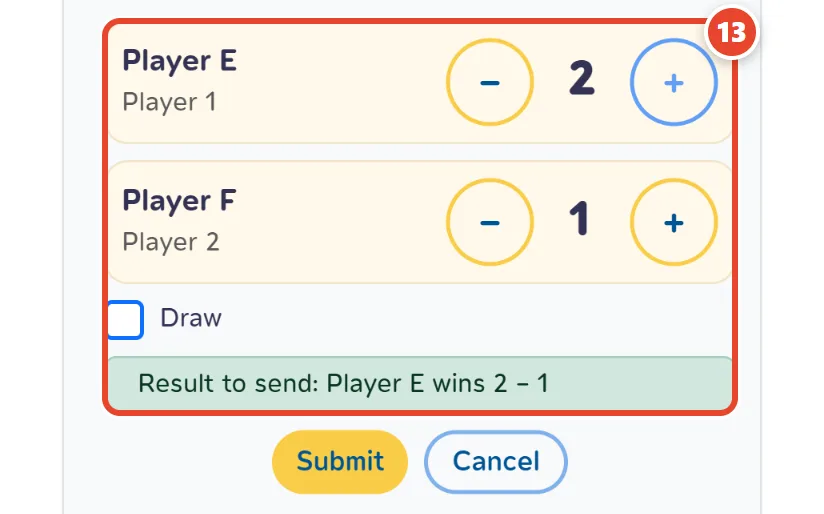
Best of 3 and up
Each player's name sits on one row with its own − / +, up to the games that win the match, and a summary line says who wins before you send.
Swiss + Top Cut
Swiss rounds, then the best players play single elimination

Top Cut when you create the event
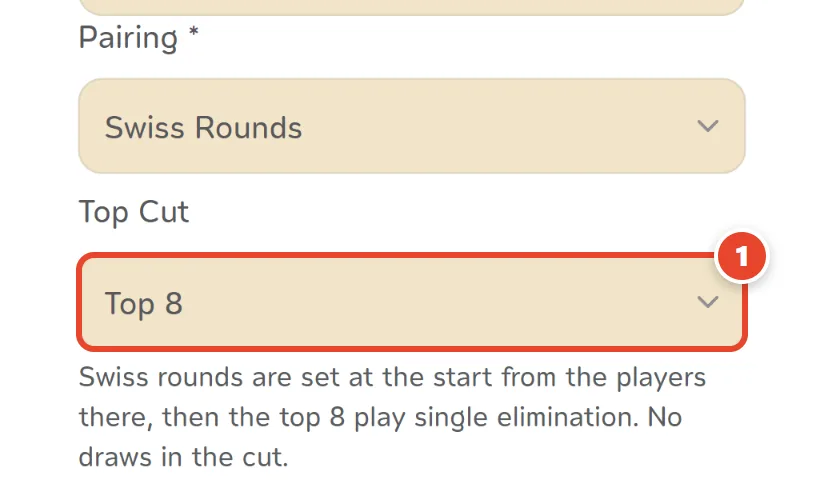
With Swiss pairing, pick Top 4, 8, 16 or 32. The Swiss round count is set at the start from the players who are there. You need more players than the cut, and its size cannot change once play starts (no cut set at all? one can still be added after the Swiss — see the last note). Under 4 players the event plays a Round Robin with no cut; undoing the start brings the cut back.
Start the Top Cut
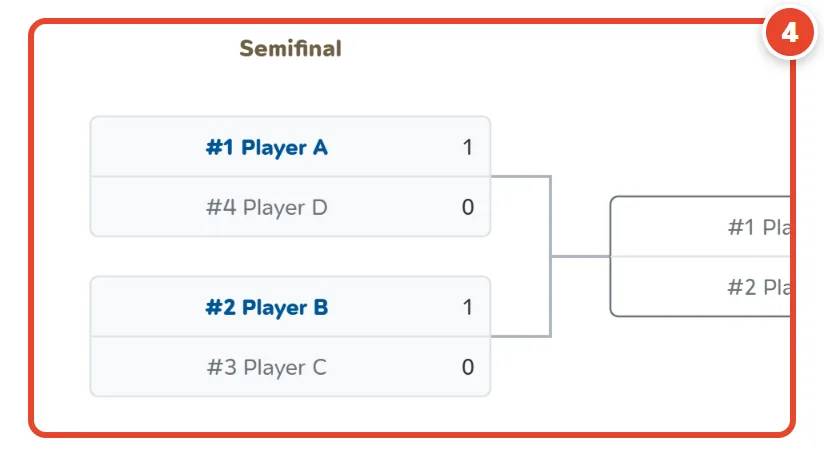
When the last Swiss round has every result, close the round first (as every round); then the main button becomes “Start Top 4” (or your size); tap it and confirm. The bracket is seeded from the Swiss standings — 1 vs 4, 2 vs 3 — and anyone who dropped is skipped.
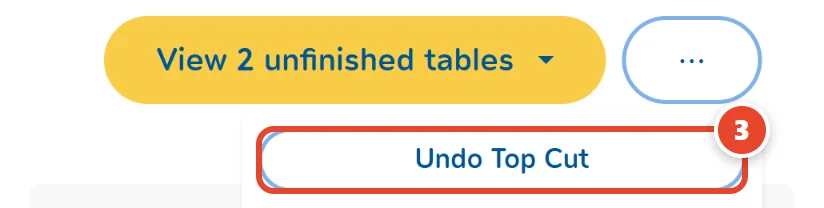
⋯ → Undo Top Cut
Started too early, or a Swiss result to fix first? It is in the ⋯ menu while no Top Cut table has a result: undo, then start again.
Playing the cut
No draws: when time runs out, play a deciding game. Winners move on to their next table by themselves; when every table has a result tap Next Round Now, and after the final Complete Tournament.
The bracket for everyone
Players follow the bracket on the event page, tab Bracket. The final standings follow the bracket (champion, finalist, then by the round reached), and so do the automatic honors.
Too few players left for the cut
If drops leave half the cut or fewer (say 2 players for a Top 4), the main button is Complete Tournament instead — the Swiss standings are the final result.
Forgot the cut? Add a Top Cut after the Swiss
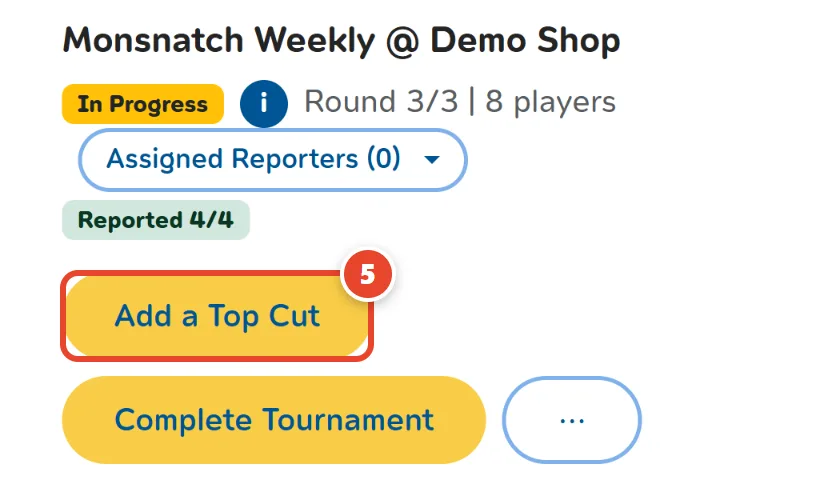
A Swiss event made without a Top Cut can still get one. When the last Swiss round has every result, tap Add a Top Cut beside Complete Tournament, pick the size — only sizes the players still in can fill are offered (more players than the cut) — and confirm. The last round is closed for you and the cut’s first round starts at once, seeded from the Swiss standings as above; the Swiss rounds and points stay as they are. Undo Top Cut in ⋯ makes it a plain Swiss again. Do not wait long: an event with every round played completes itself an hour after its last result.
Lucky Draw
From the Manage page, during the event
Tap Draw
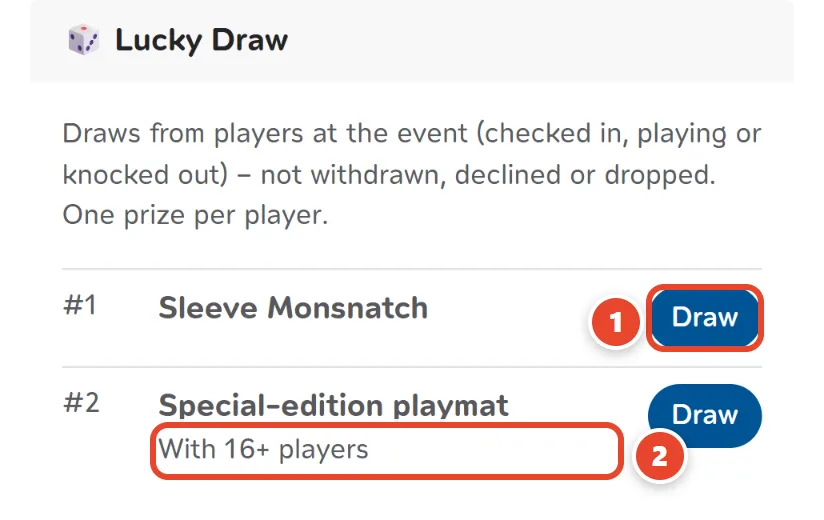
A winner is drawn from the players at the event and shown full screen — good on a projector.
Prizes with a minimum
A prize marked “With 16+ players” can only be drawn once that many are at the event (checked in, playing or knocked out). Below that, the draw refuses and says how many are there now.
Who can win
Players who are checked in, playing or knocked out. Not those who withdrew, were declined or dropped. One prize per player.
Redraw
If the winner is not there, draw again.
After the event
Once the event is completed the Lucky Draw is tucked away — open it from ⋯ → Lucky Draw. Redraw asks you to confirm first.
Good to know
Read before you create an event
Normally 4 events at a time
Counts events taking entries, checking in or running (including those waiting for approval). Finish or cancel an old one before creating another — or ask an admin if your shop needs more.
Entry fee · Door Gift
These cannot be set on the site — ask an admin to set them, including checking entry-fee payment slips.
Under 4 players
you can still tap Start · pair round 1: the event plays as a Round Robin and counts for no PP or ELO. A Round Robin has no rounds: every match is open from the start, play them in any order, then tap Complete Tournament.
Editing a live event
Your changes apply at once, and every change is kept on record. A new name, description or cover is checked by the AI first (usually a few minutes); until then players see the old one. A changed match day is sent to players by email and LINE. Once an event is completed, only its cover and description can be edited.
Copy an old event
On the Manage page, tap ⋯ → Clone as new (after the event it sits outside the menu) to set up a weekly event faster (enter the new dates).
Every image
JPG / PNG / WebP up to 5 MB.
Stuck? Contact the admins on Monsnatch's LINE OA or Discord.