


Player Guide
From your first sign-in to your first event, in 22 steps. The screenshots are from a phone; it works the same on a computer.
Create your account and sign in
monsnatch.com → Login at the top right
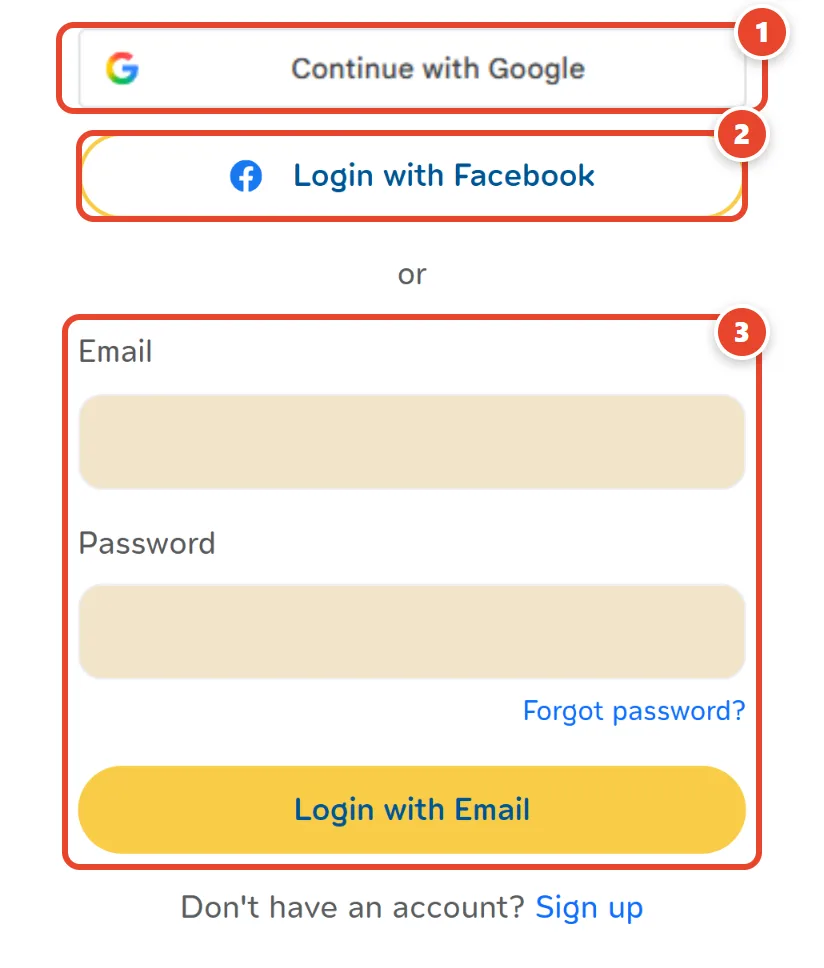
Google
The quickest way: your Google account, no new password; the first time, your Monsnatch account is created for you. On a phone the button is Google's own, “Continue with Google”.
Login with Facebook
Works the same way with your Facebook account.
Login with Email
Prefer an email and a password? Tap Sign up under the buttons first (at least 8 characters). Forgot it later: Forgot password?.
Opened the link inside LINE or Facebook?
Those apps open websites in a browser of their own, where Google refuses to sign anyone in. Open monsnatch.com in Chrome or Safari instead.
Set up your account
The account menu → Account Settings
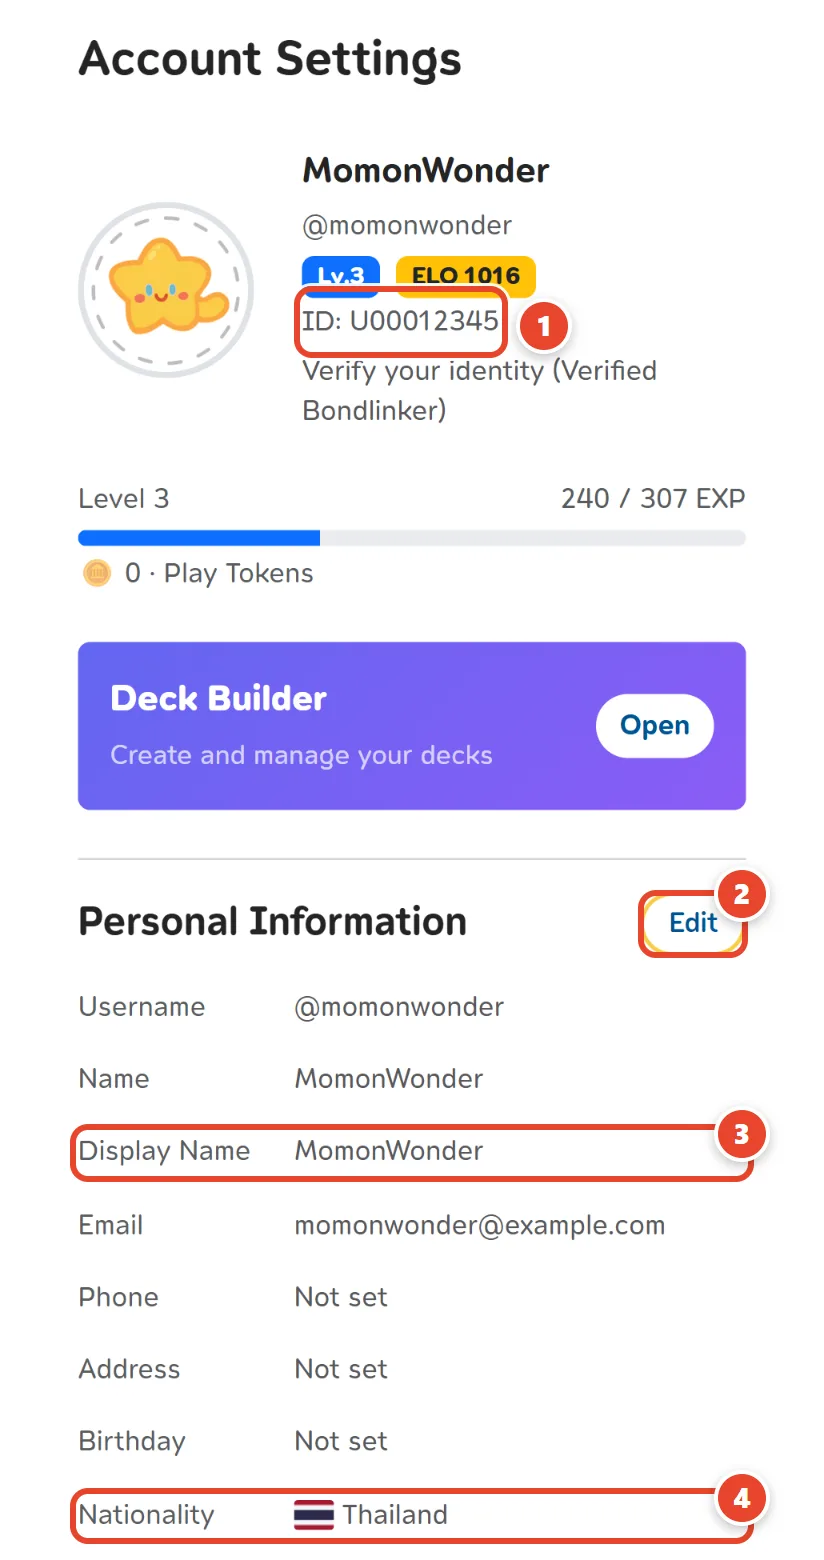
Your player ID
The code next to ID: is yours alone. Give it to a shop or to the Monsnatch team when they need to find your account.
Edit
Opens your details for editing; Save keeps them.
Display Name
The name shops, opponents and the rankings see: in the entry list, the standings and the boards. Use the name people at your shop know you by.
Nationality
Shown as a flag on your profile.
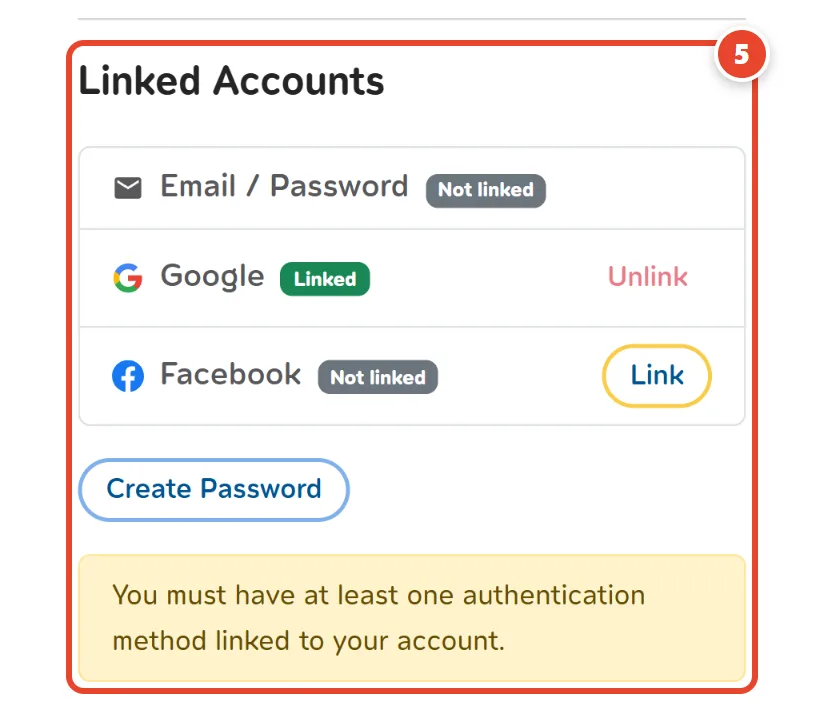
Linked Accounts
Add Google or Facebook to sign in more than one way, keep your account when you change phones, and link Discord to play Monsnatch in Discord with the same account.
The website's language
The flag in the menu bar switches language. Your choice is kept with your account, and your notifications arrive in it too.
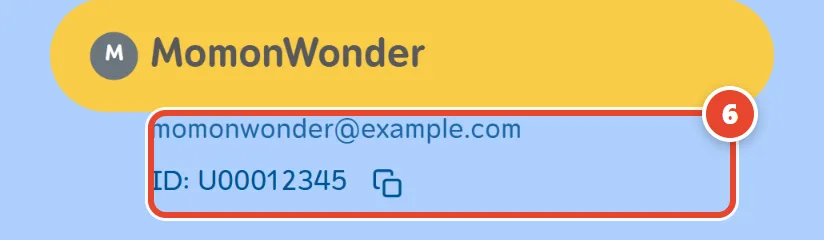
Your ID in the account menu
Open the account menu: under your name are your email and ID: U…. The copy icon after the ID copies it, ready to send to the shop.
Turn on notifications on your phone
Account Settings → Notifications on this device
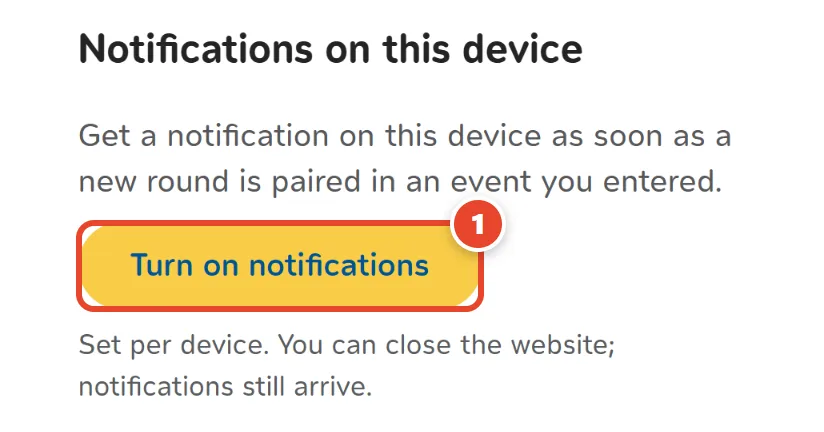
Turn on notifications
Your browser asks once: tap Allow. Set it on each phone or computer you use.
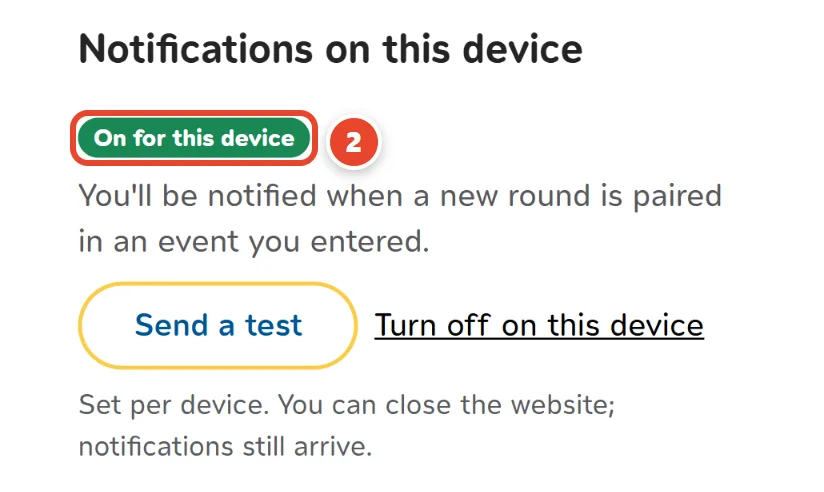
On for this device
This device is ready. Send a test sends one to check it pops up. You can close the website: notifications still arrive.
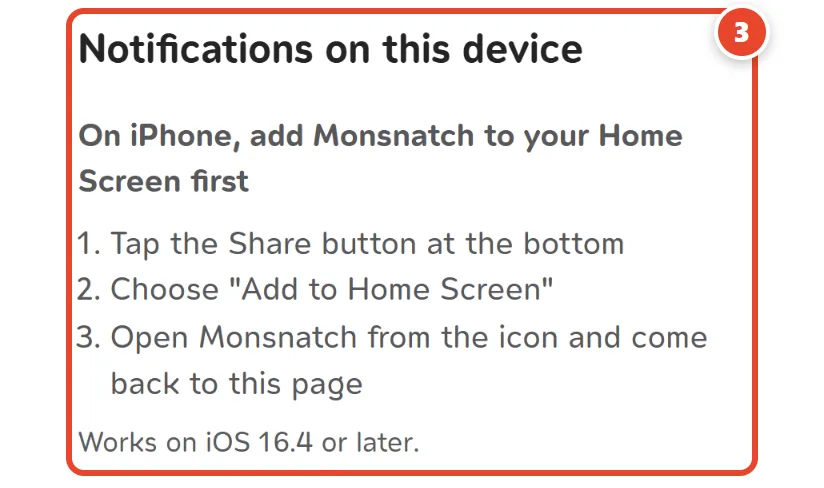
On iPhone: add Monsnatch to your Home Screen first
In Safari tap Share → Add to Home Screen, open Monsnatch from that icon, sign in, then turn notifications on there (iOS 16.4 or later).
What you are told
When a round of an event you entered is paired: your round, table and opponent. A tap opens that event's My match page.
Inside LINE or Facebook it cannot be turned on
The card says so and opens the page in your phone's browser; turn notifications on from there.
Find an event
The Game → Tournaments menu, or monsnatch.com/tournament
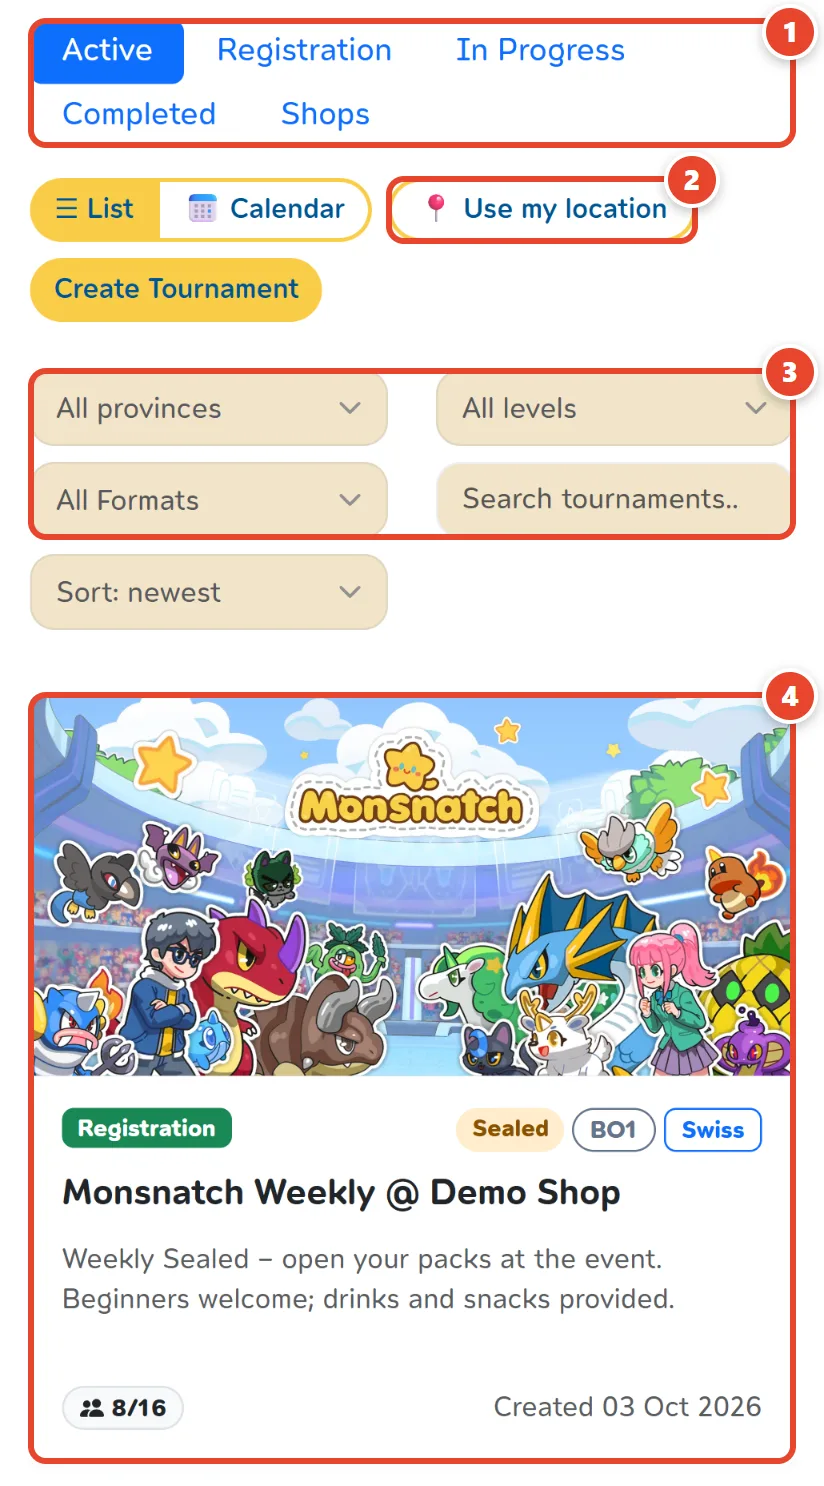
Active
Every event that has not finished. Registration shows only the ones you can still enter; Completed the finished ones, with their results.
Use my location
Puts the events at the shops nearest you first, within the distance you pick. Your browser asks for your location first.
Filters
Pick a Province or a Level, or type part of the event's name in the search box.
An event
Its status, format and how many have entered out of how many it takes. Tap it to open the event.
Calendar
The same events, day by day on a calendar.
Enter an event
The event's page → Registration
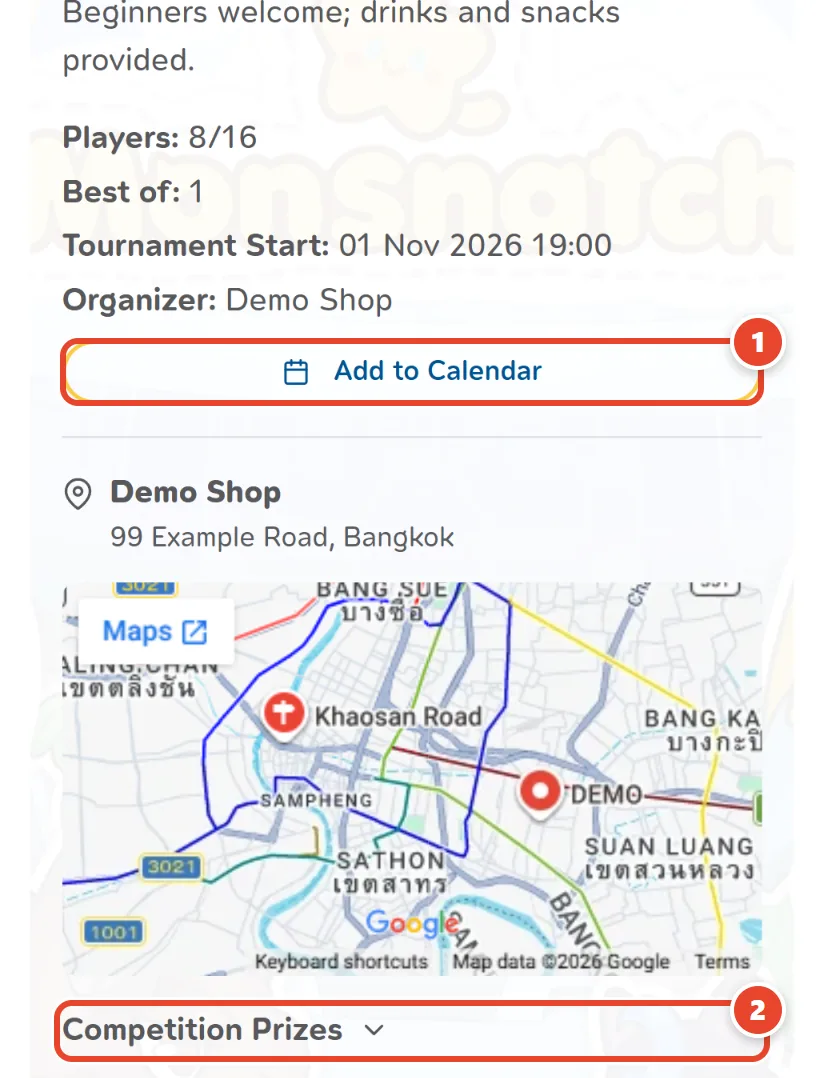
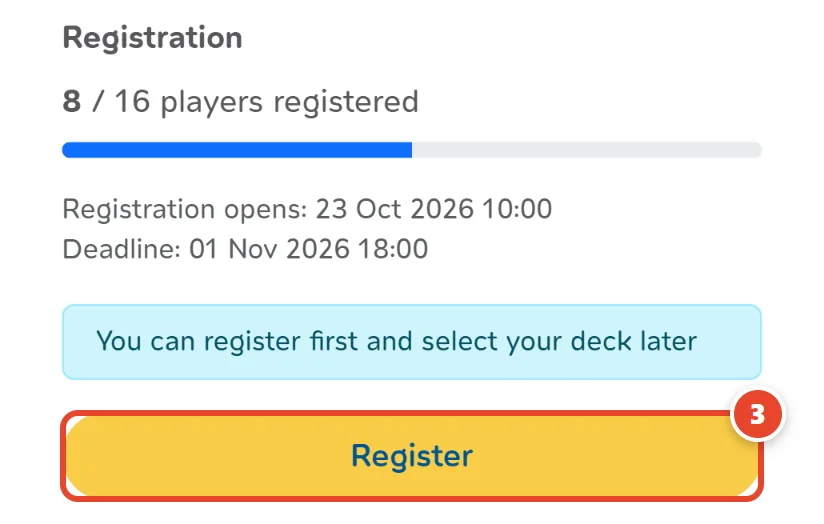
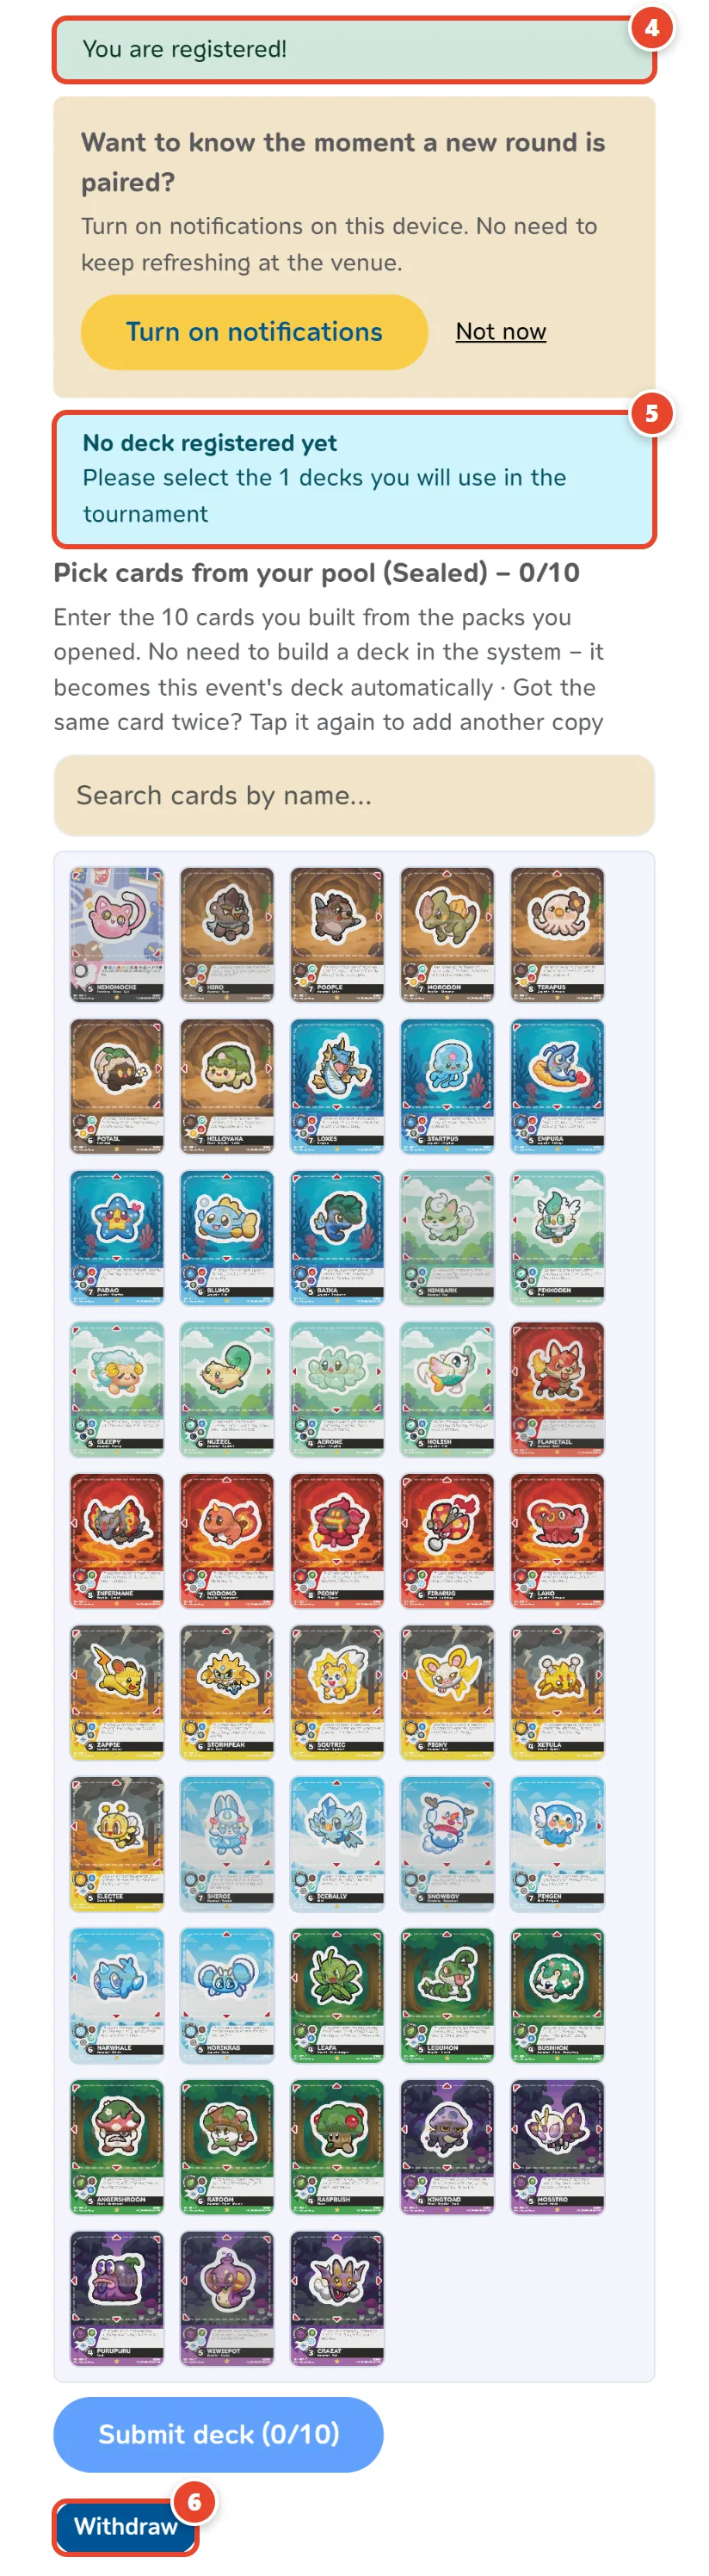
The event at a glance
When play starts, who runs it, how many have entered and the match format. Add to Calendar puts it in your phone's calendar. The shop's address and map are just below.
Competition Prizes
Tap to see the prize for each place, and the Lucky Draw Prizes drawn at the event.
Register
On a phone this button stays at the bottom of the screen. For a free event, one tap and you are in.
You are registered!
Your name is in the entry list. If the shop reviews entries, it says Waiting for the organizer to review your application... until the shop accepts you.
Your deck for the event
Constructed: pick decks you built in Deck Builder, before or after entering. Sealed or Draft: you enter the cards from the packs you open here, on the day.
Withdraw
Changed your mind? Withdraw while registration is open; you can enter again as long as it stays open.
Submit your decklist
The event's page → Registration, once you have entered
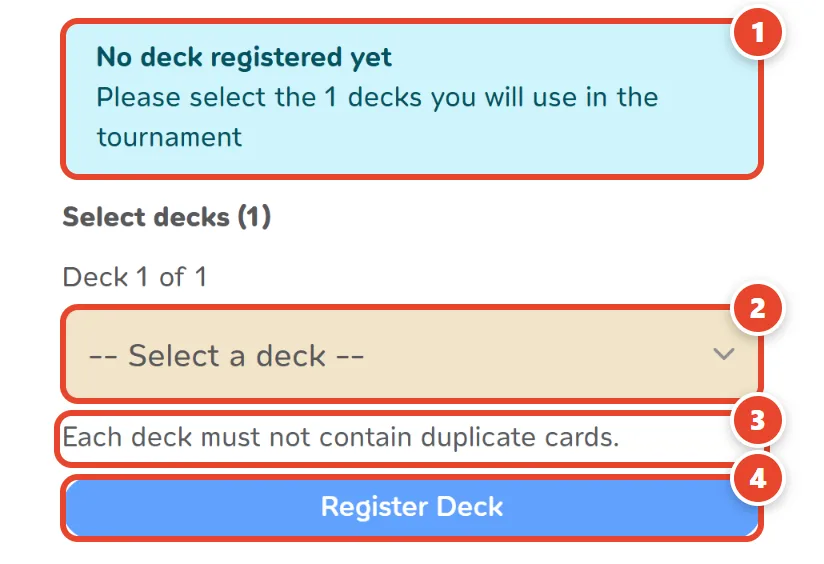

No deck registered yet
A Constructed event needs the decks you will play, as many as the event asks (it says how many next to Register). This notice stays until you have sent them all. You may enter first and send the decks later.
Pick your decks
Each box lists the decks you built in Deck Builder; a deck is 10 cards. No deck yet? Build one there first, then come back to the event's page.
The deck rules
No card twice in one deck. When the event asks for more than one deck, a card may be in only one of them. The page tells you if a pick breaks a rule.
Register Deck
Sends the decks. The panel then says how many decks you have sent.
Change Deck
Change your decks any time while registration or check-in is open. Once play starts, they are locked. The organiser and the event's judges can open the decklist you sent.
Sealed or Draft
Nothing to send beforehand: on the day you type in the cards from the packs you open (see match day).
Events with an entry fee
Entry Fee · PromptPay · transfer slip
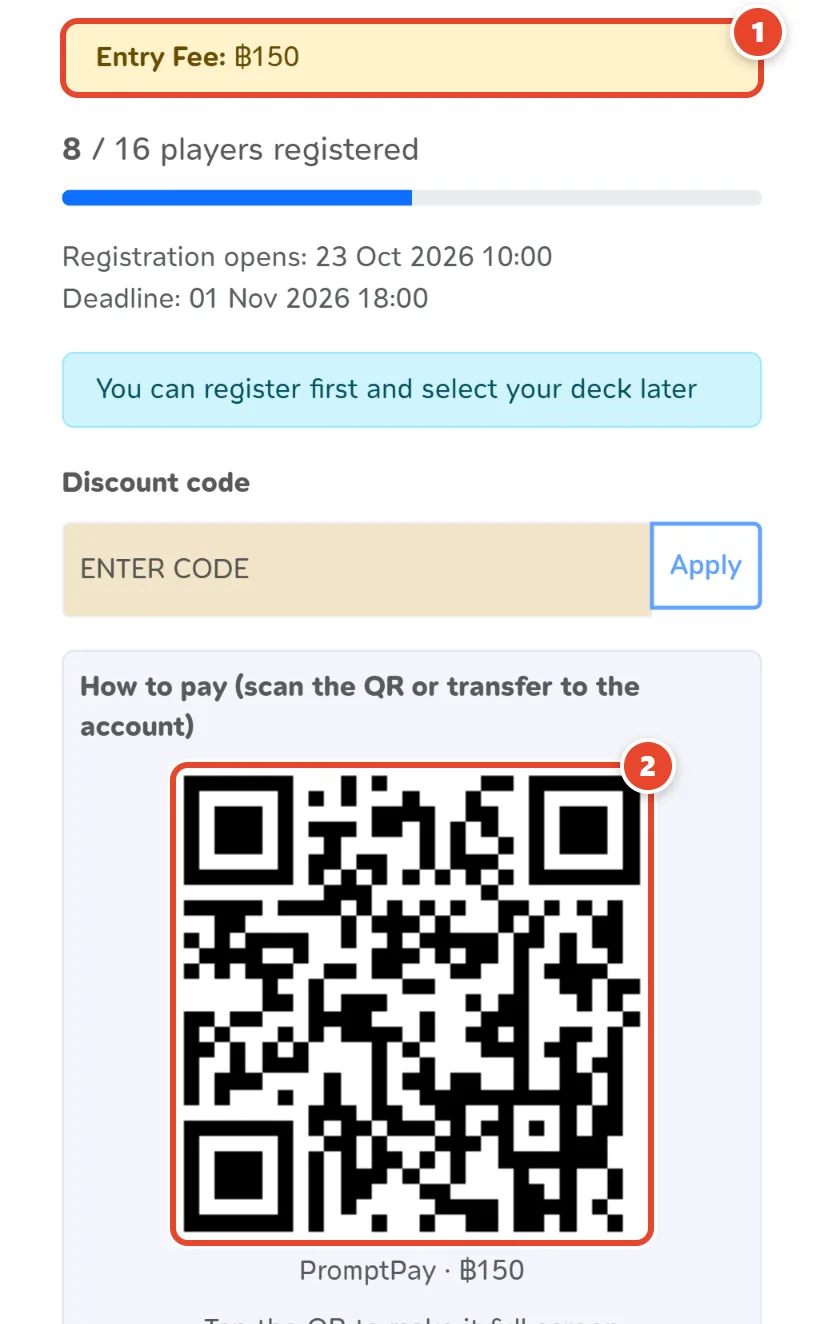
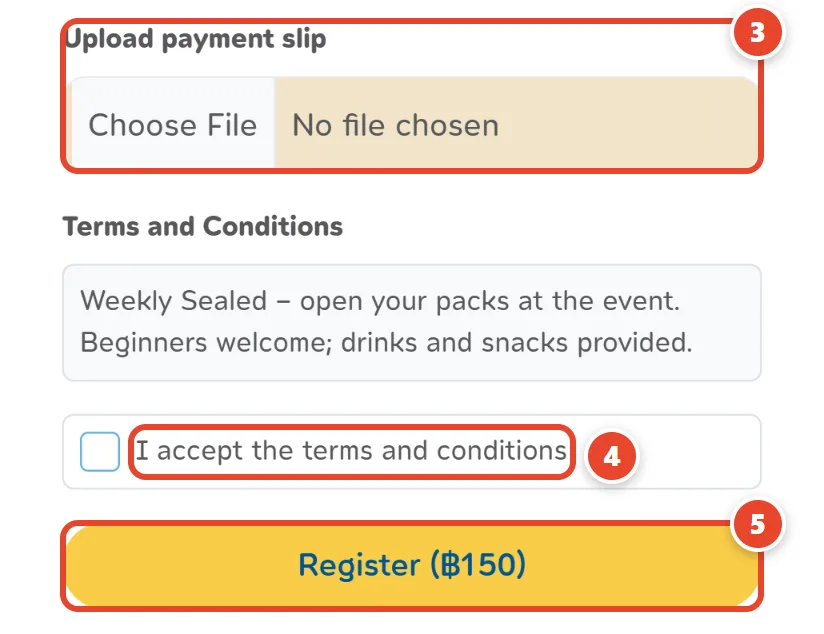
Entry Fee
The event's fee. Got a code from the shop? Enter it under Discount code before you pay.
PromptPay QR
Scan it with your banking app; the amount is already filled in. Tap the QR to make it full screen.
Upload payment slip
The picture of your transfer slip, once you have paid.
I accept the terms and conditions
Read the shop's terms above, then tick the box.
Register with the fee
If something is still missing, the button takes you to it instead.
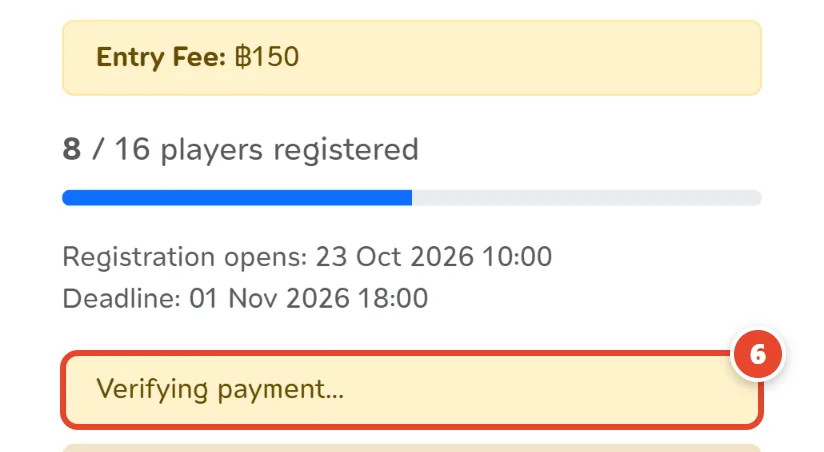
Verifying payment...
The shop checks your slip and accepts your entry. If it is declined, the page shows the shop's reason and you can enter again.
Store Showdown
The fee goes straight to the shop (the QR names it). While WP entry is on, registering also takes WP — your own price, shown before you sign up: 5 WP for a first Showdown; each one finished without the title takes off 2, then 1, then 1 (1 WP at least); each title adds 2 (7 WP at least), and a champion's price no longer drops. The WP comes back if you withdraw before the start, the shop declines you, or the event is cancelled — not if you don't turn up. New members with a verified email start with 4 WP.
paid at the store
Some events show the fee as paid at the store: no slip, you pay at the counter on the day.
Enter through the shop with a key
Events that say Register through the shop
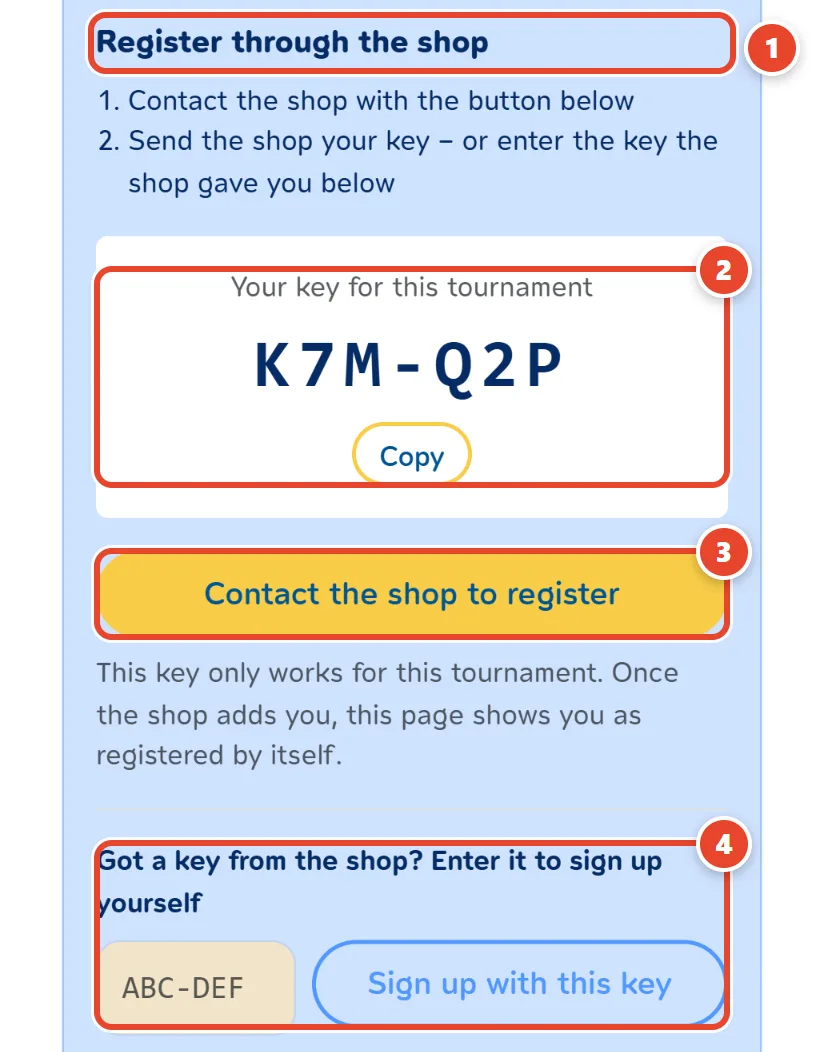
Register through the shop
The shop takes the entries itself (paying at the counter, for example), so there is no Register button.
Your key for this tournament
Your key for this event only. Copy it and send it to the shop.
Contact the shop to register
Opens the shop's LINE or page, where you send your key.
Got a key from the shop? Enter it to sign up yourself
Got a code from the shop instead? Type it and tap Sign up with this key: the ordinary entry form opens.
Once the shop adds you
This page shows you as registered by itself; nothing else to do.
On the day: check in, and your table
Before the first round
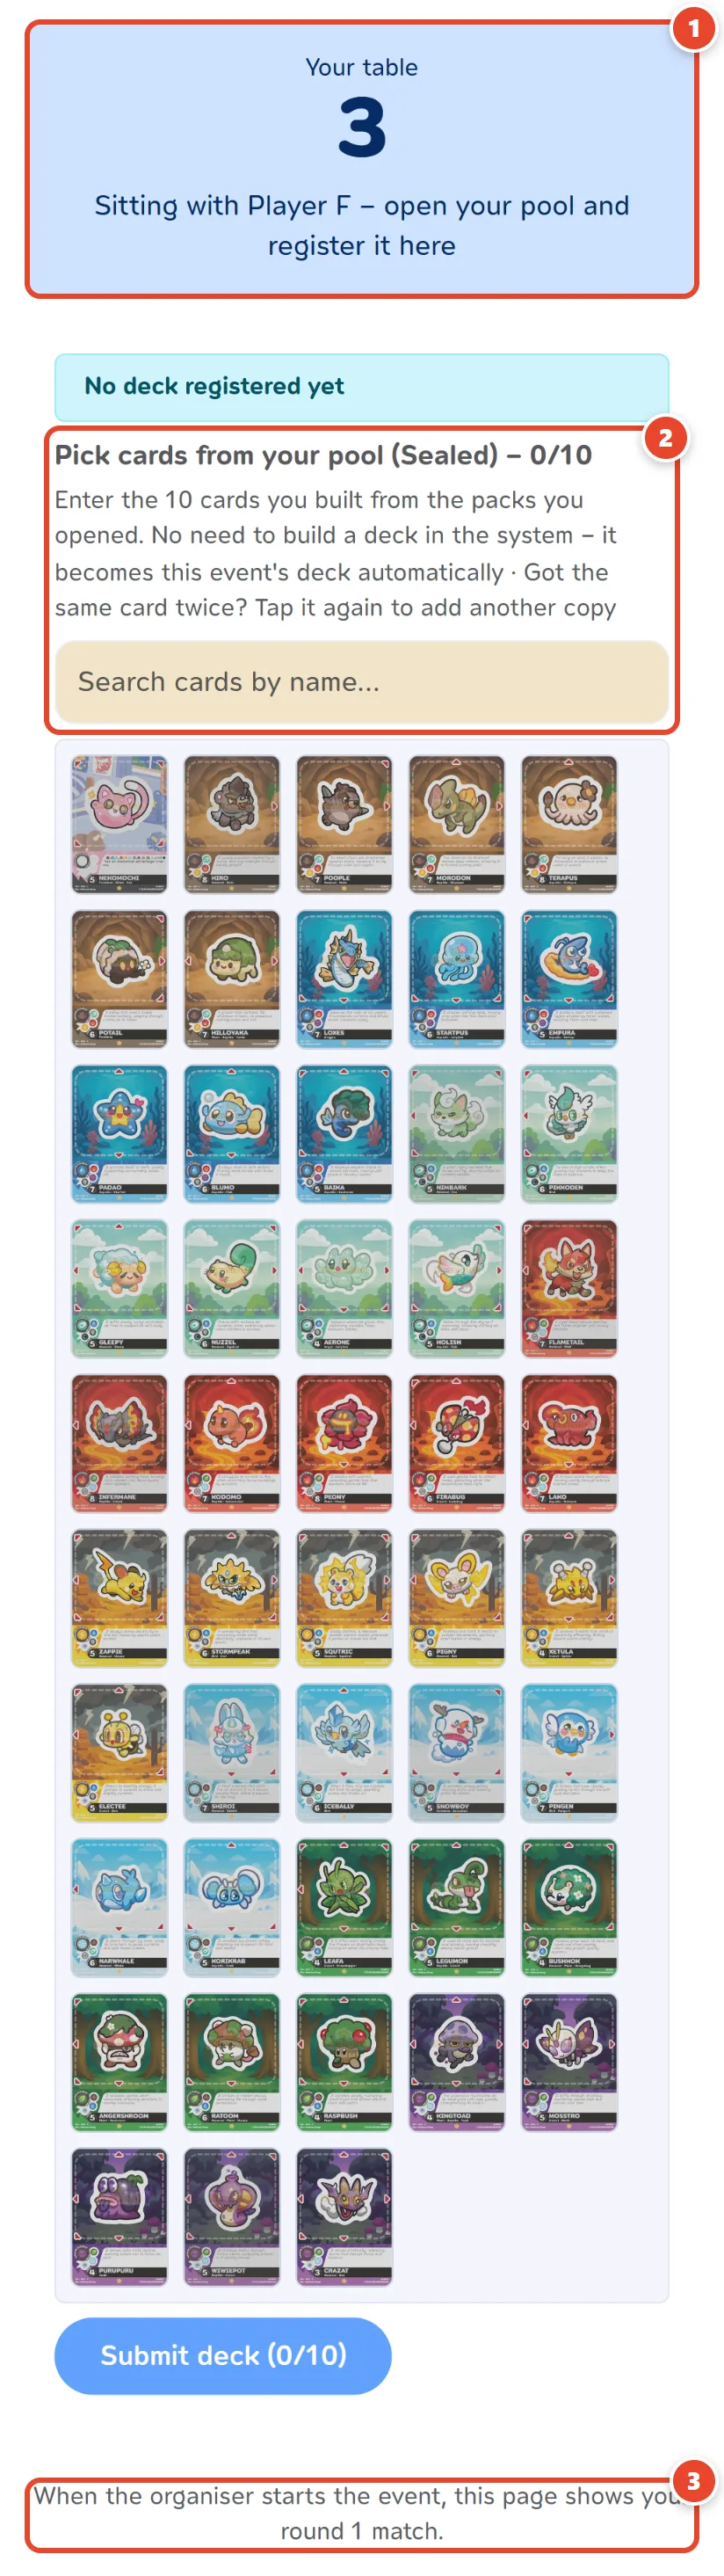
Your table
If the shop seats players before the start (to build Sealed decks, for example), your table and who sits next to you show here, and on the event page's button too.
Sealed: enter your pool
Type in the cards you built from the packs you opened, one by one; the site makes them your deck for this event. No need to build a deck on the site first.
Wait for the start
When the shop starts the event, this page turns into your first-round match by itself.
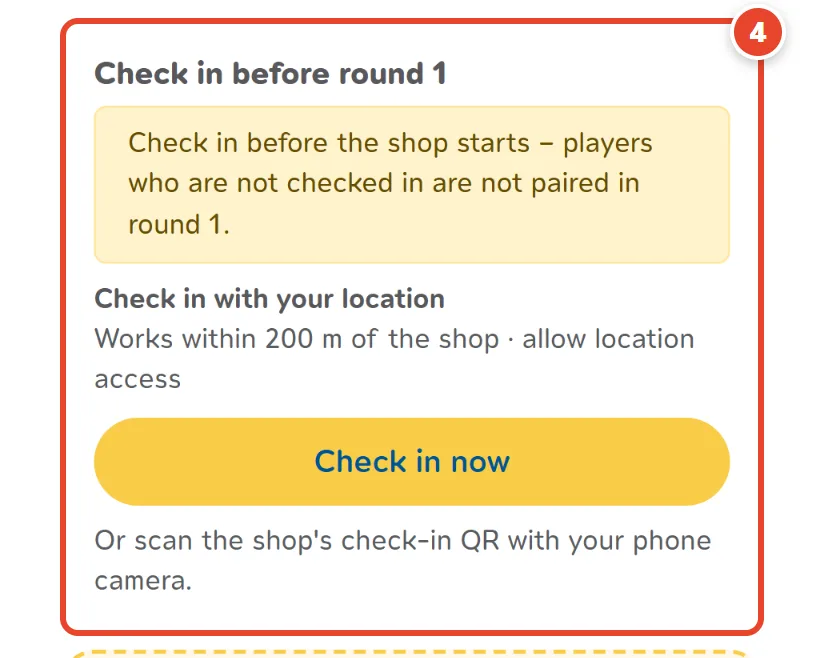
Check in at the shop
Tell the shop you have arrived; the shop ticks you in. Some events give WP only to players who were checked in.
Check in before round 1
You can also check yourself in, from 1 hour before the start: on the event page press Check in now within 200 m of the shop (allow location), or scan the shop's check-in QR with your phone camera. Missed it before the start? Tell the shop at the desk.
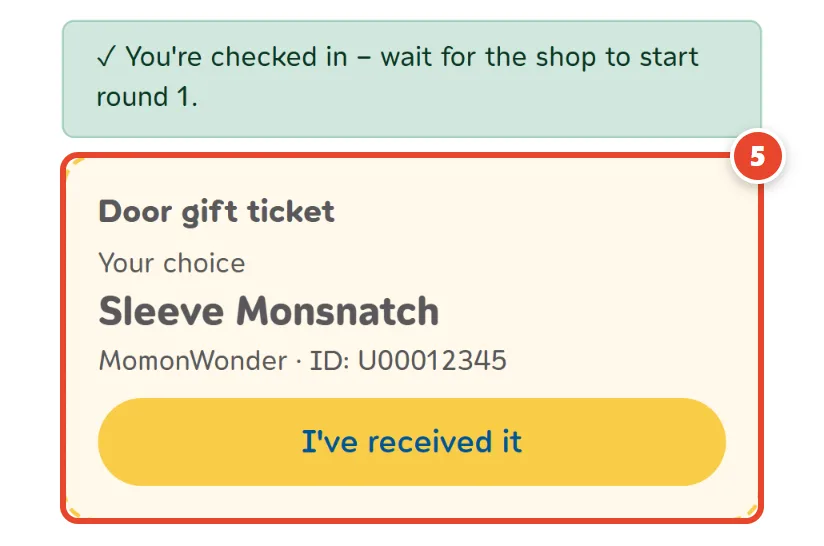
Door gift ticket
At an event with door gifts, your ticket stays on the event page all event. Once checked in, collect the gift at the desk and press I've received it in front of the staff. It cannot be taken back; pressed by mistake? Contact an admin.
My match: your table and opponent
Every round, on your phone
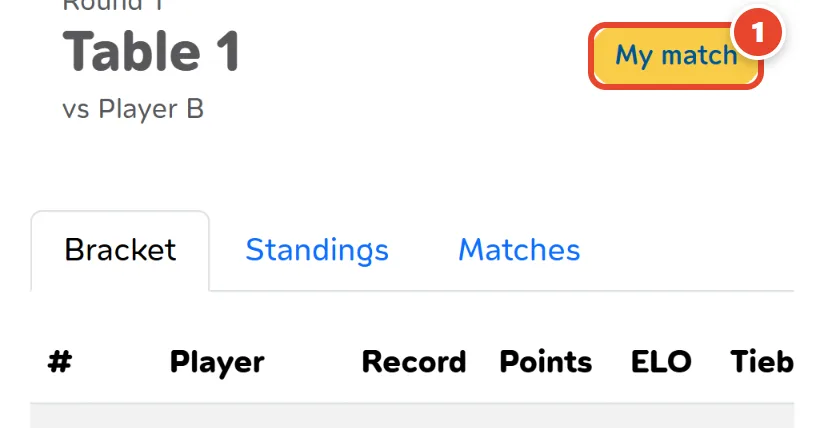
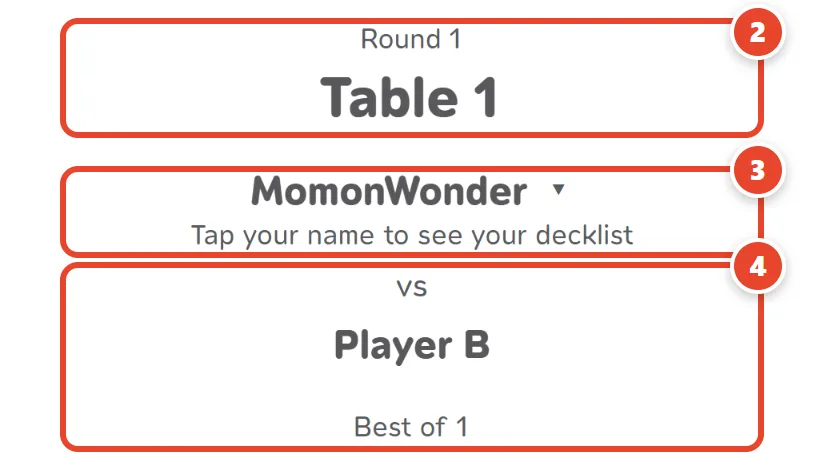
My match
On the event page once it has started. The same button floats at the bottom right of the screen, and is in your account menu too.
Round and table
The round being played and the table to sit at.
Your name
Tap it to see the deck you entered this event with.
vs
This round's opponent, and how many games you play (Best of).
Notifications bring you here
With notifications on (step 3), each new round's pairing opens this page in one tap.
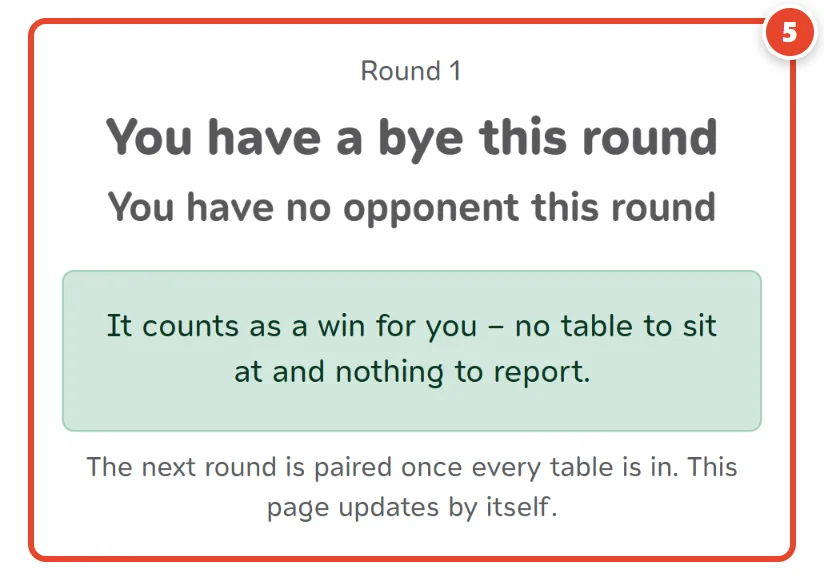
You have a bye this round
With an odd number of players, someone has no opponent in a round. This page then says you have a bye: it counts as a win, with no table to sit at and no result to send.
Report your result
When your match is over
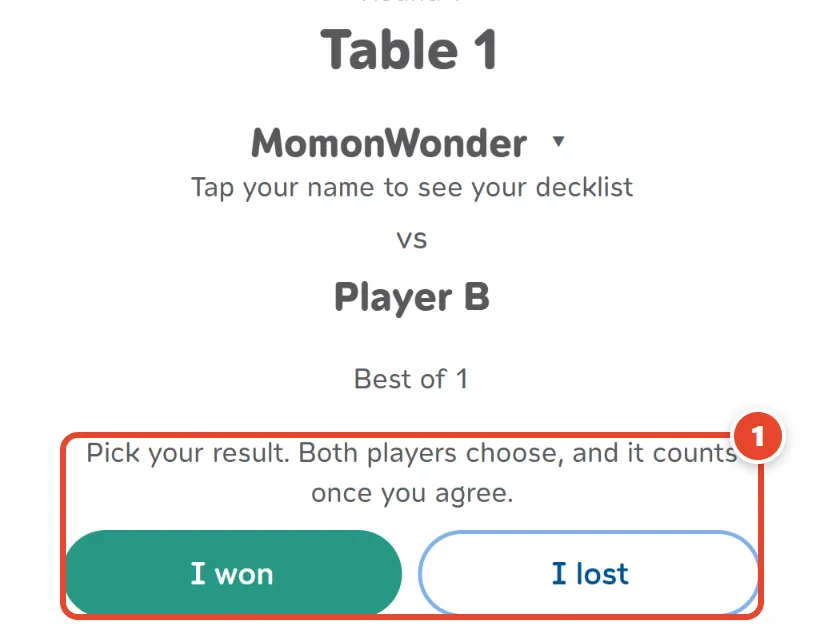
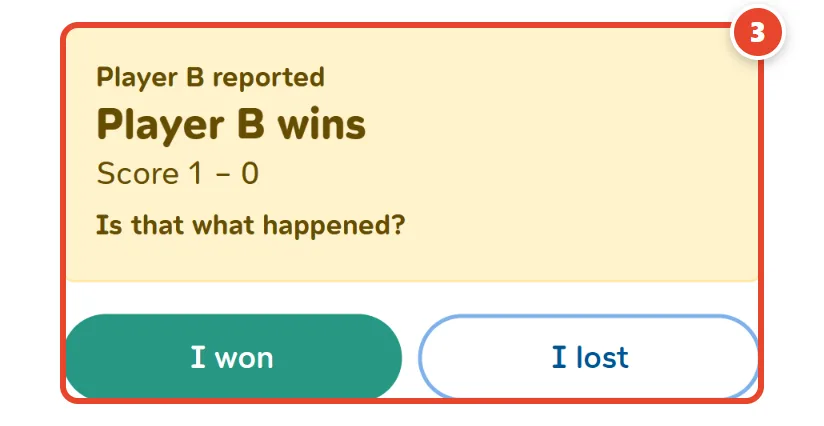
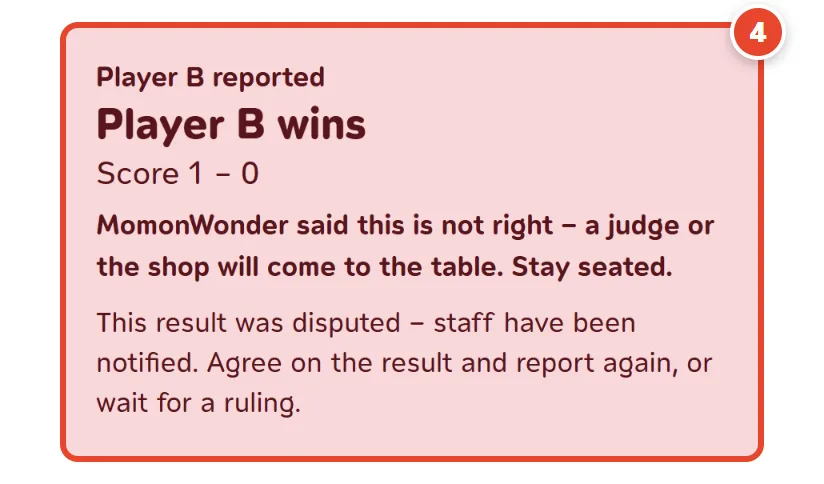
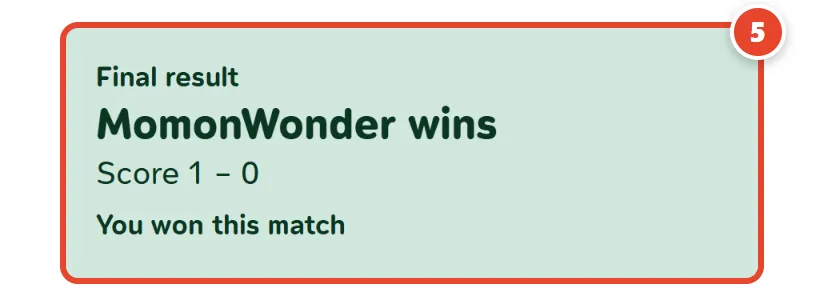
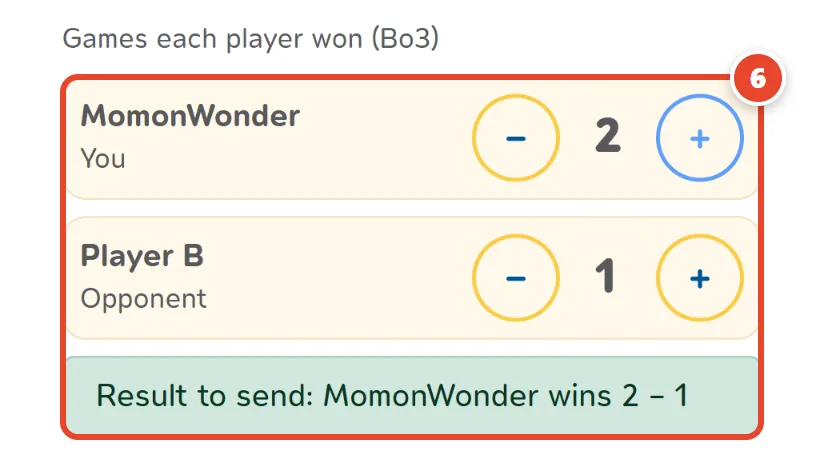
I won / I lost
Both players pick their own result. It is recorded only when the two match.
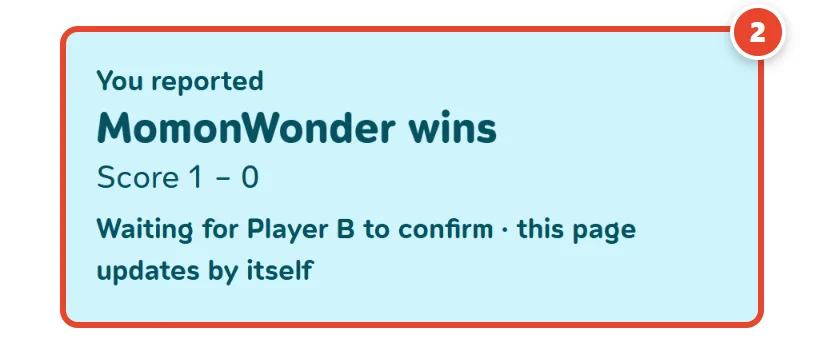
Waiting for your opponent
Yours is sent; the page updates by itself once your opponent confirms.
Your opponent reported first
What they reported shows here. Pick your result to confirm it.
If the two don't match
The result is marked disputed and the staff are told. Agree on it and report again, or wait for a judge.
When the shop records results
At some events the organiser records every result, and once the shop closes a round, results go through the shop too. Then tell the shop your result.
Who won, at every step
Waiting for your opponent, their report coming in, a disputed result and the final result all show the winner's name large with the score, and in a dispute who reported what.
Best of 3 and up
Each player's name sits on one row with its own − / +: set the games each of you won. The line under it shows the result you are about to send.
Standings
On the event page, updated as results come in
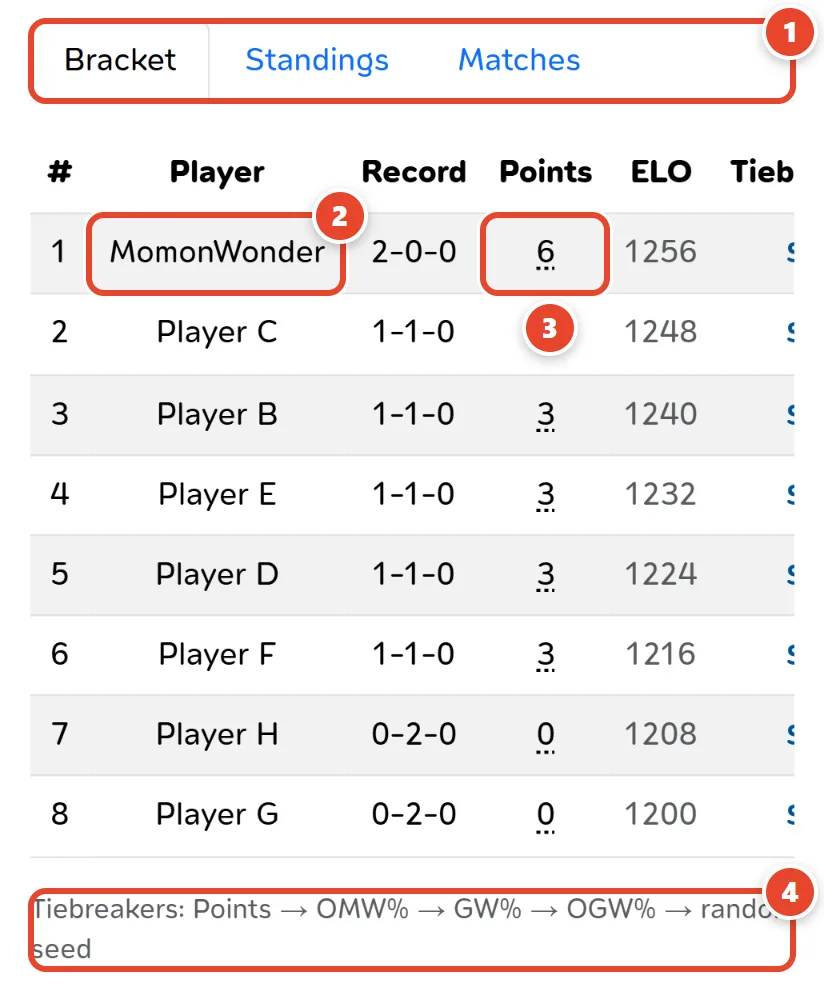
Bracket · Standings · Matches
The first two show the standings; Matches lists every table of every round.
Your row
Your place, record (wins-losses-draws) and points.
Points
A win is worth 3 points, a draw 1. Tap the number to see how it adds up.
Level on points
Players on the same points are split in this order. Tap Show in the Tiebreakers column for each player's figures.
Top Cut
Events with a knockout after the Swiss rounds
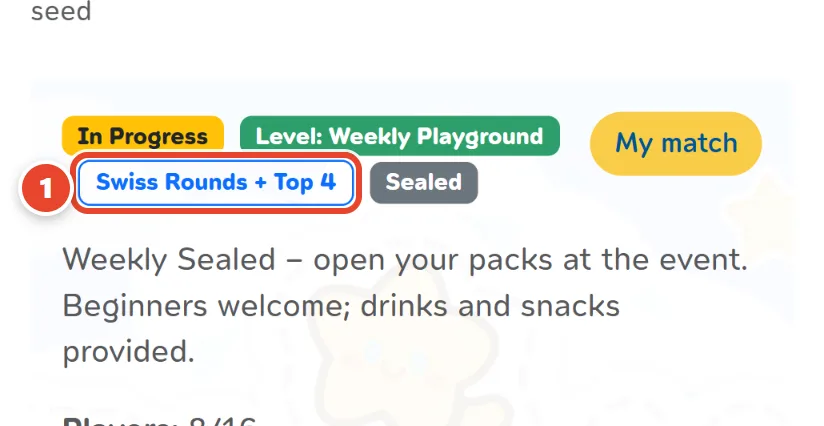
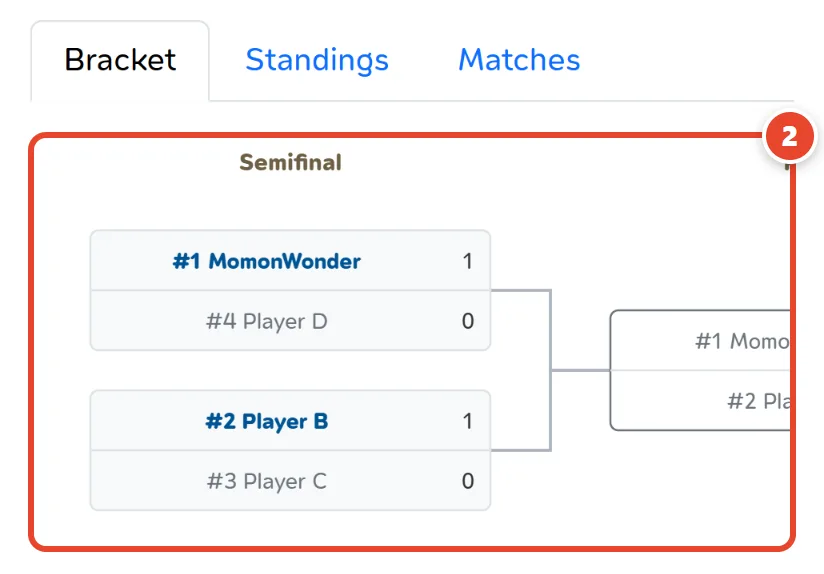
Swiss + Top
Once every Swiss round is played, the top players (Top 4, Top 8…) play a knockout.
The bracket
Shows above the standings in Bracket: the highest place plays the lowest, and winners go through.
Playing in the cut
Report results in My match as before. Lose and you are out.
My tournaments
Account menu → My tournaments
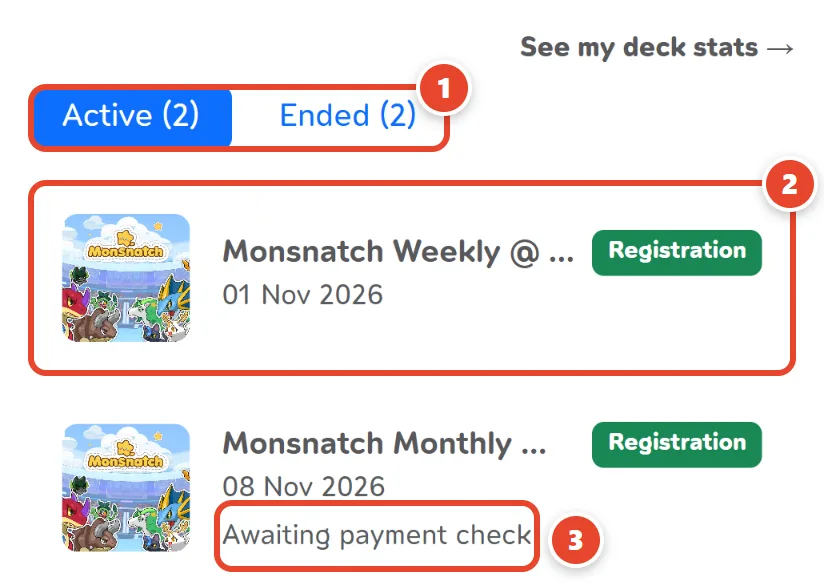
Active · Ended
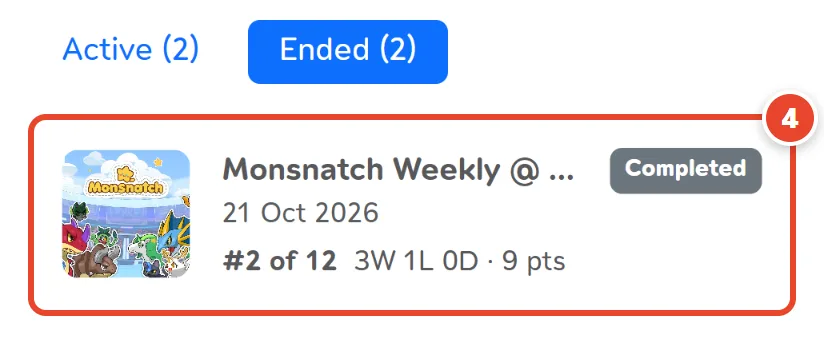
Every event you entered: the ones still ahead (nearest first) and the ones already played.
An event
Its date and status. Tap it to open the event page.
Awaiting payment check
Your payment slip is with the shop; you are in once they confirm it.
Your result
In Ended: your place out of how many, your record and points.
Rankings (SRP)
The Rankings → Players menu
Current Season · All-time
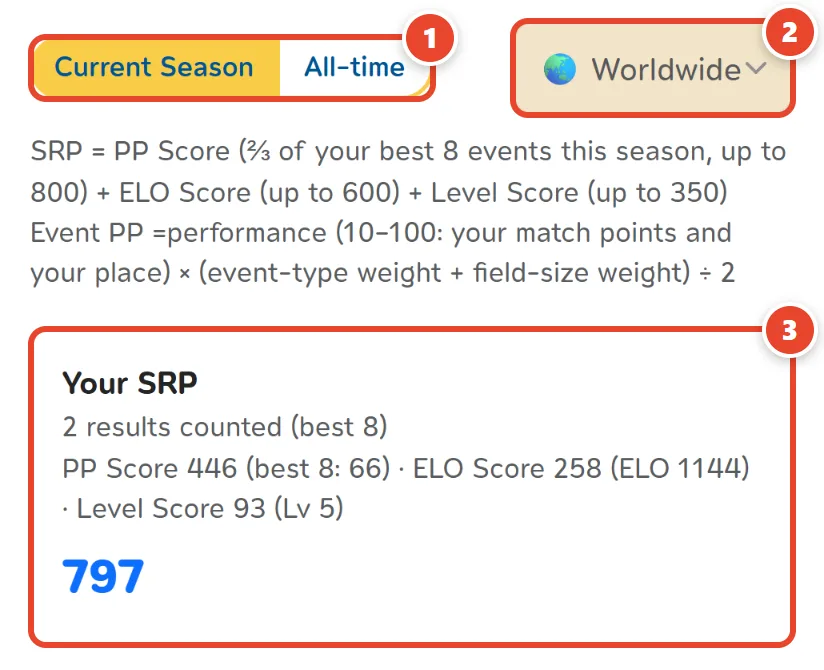
This season's board, or everything since the start.
Worldwide
Pick a country to see only its players. Players count for the country they signed up in.
Your SRP
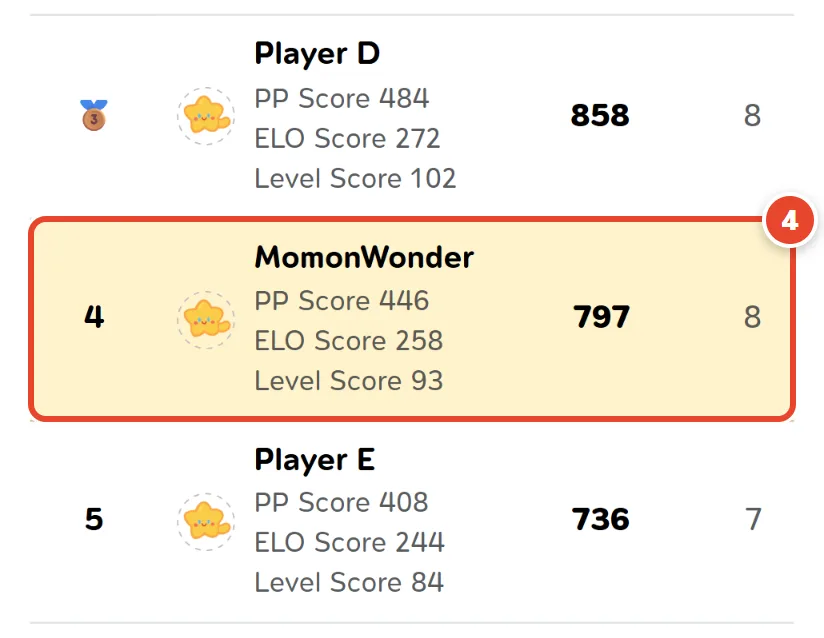
Your season score: PP from your best 8 events, plus your ELO and level. The full formula is just above.
Your row
Your place on the board, highlighted.
ELO Rankings · Champion · Store Rankings
More boards in the same Rankings menu: ELO alone, the champions, and the shops.
WP history
Your account page, or account menu → WP History
Where it came from
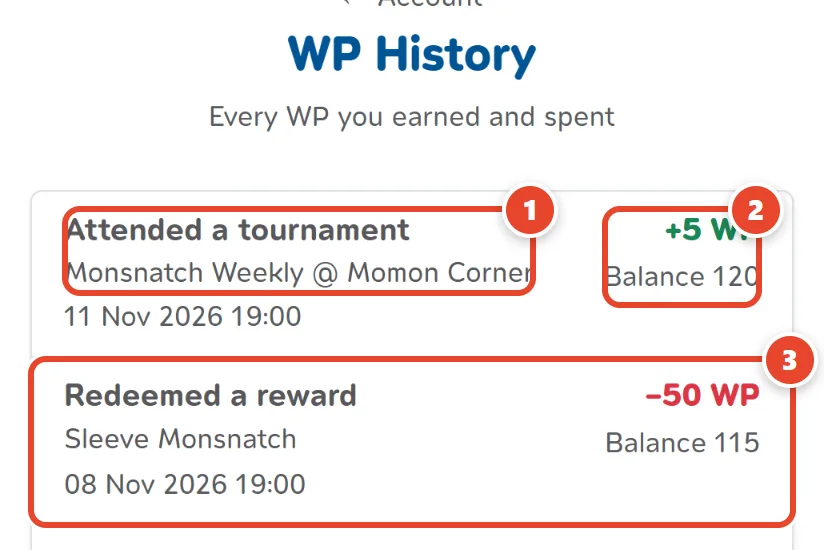
Each line says why: checking in at an event, catching a Momon, a Discord mission, or a gift from the Monsnatch team.
How much
WP in or out, and Balance: what you had left after it.
Redeemed a reward
WP you spent on a reward, with the reward's name.
Newest first
Load more at the bottom shows older lines.
Rewards
The Reward Book menu
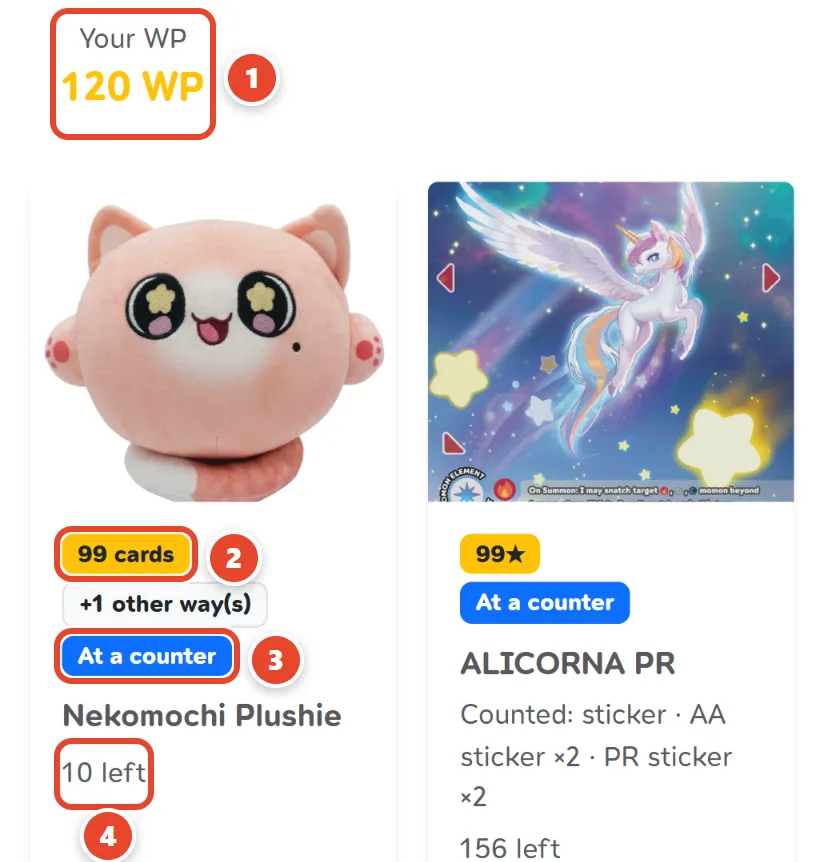
Your WP
Your WP right now.
What it costs
Each reward takes WP, stars (★, counted from the cards you bring) or a number of cards you own.
At a counter
Bring your cards to a Monsnatch counter or an event booth and show the QR for staff to scan.
Left in stock
How many are still there to redeem.
Tap a reward
Its details, what you need, and the redeem button. WP rewards are redeemed right on the site.
Card database
The Game → Card Database menu
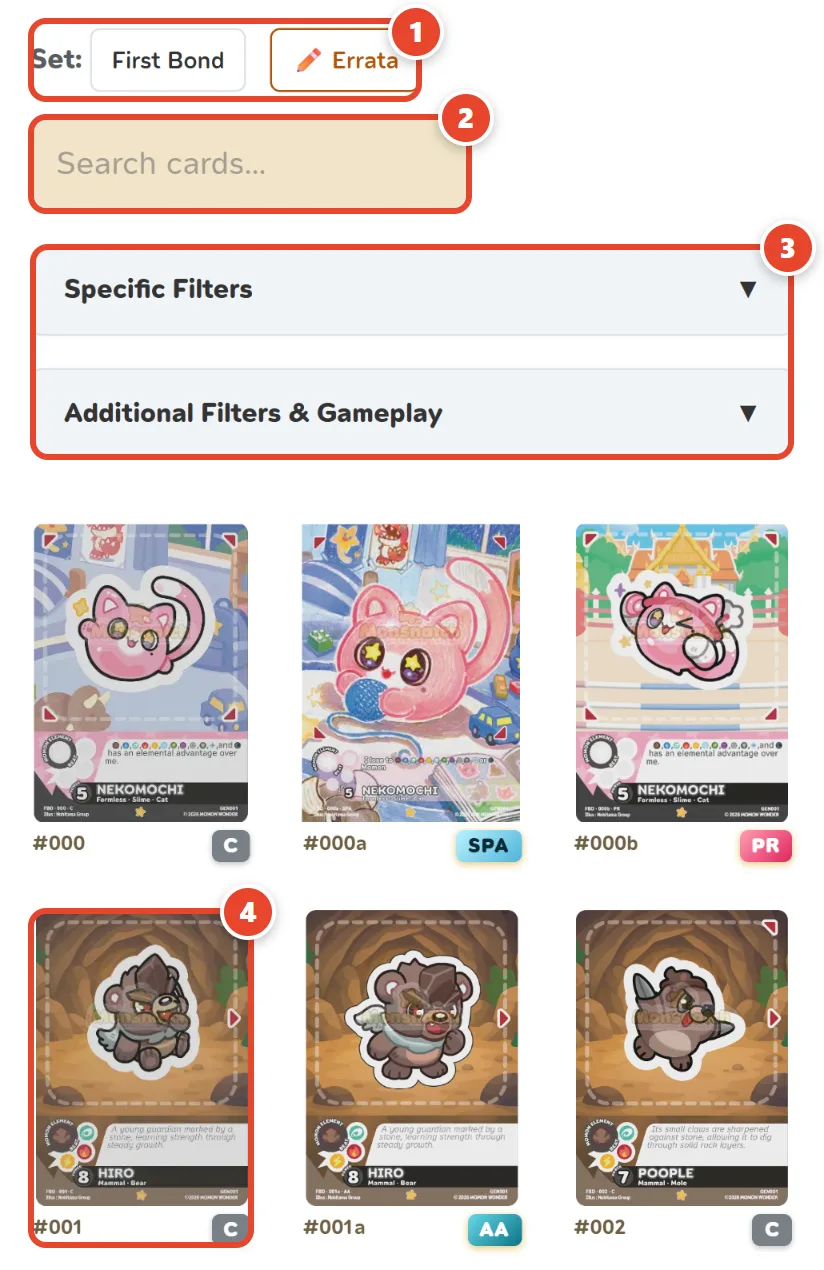
Set · Errata
Pick a set, or tap Errata to see only the cards whose text has been corrected.
Search
Type part of a card's name.
Specific Filters · Additional Filters & Gameplay
Element, rarity, Sight type and Power; then traits, keywords, Snatch directions and the elements a card beats.
A card
Tap it for the full card: its ability, FAQ, printings and errata. The tag in the corner is its rarity or printing (C, SPA, AA, PR…).
My decks
The Game → Deck Builder menu
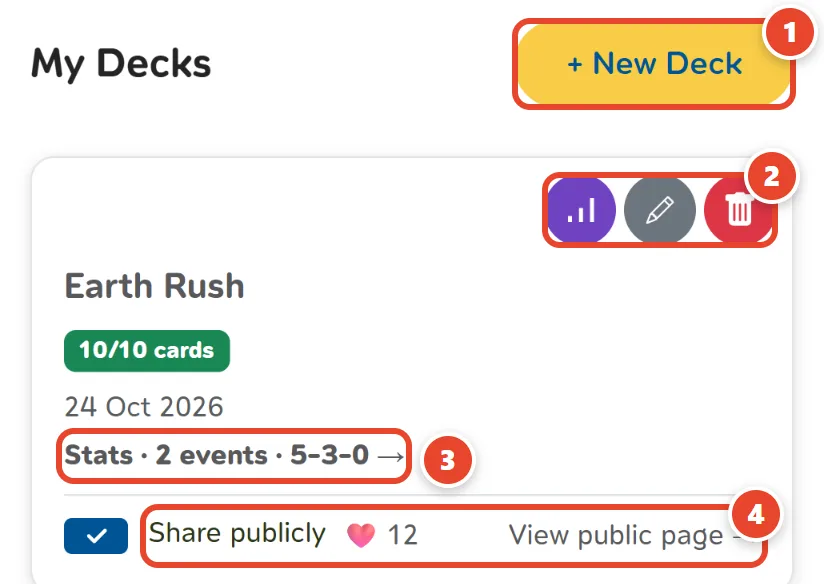
+ New Deck
Start a deck. A deck is 10 cards.
Deck Analysis · Edit deck · Delete deck
The three buttons on each deck.
The deck's record
Events played with it and its wins-losses-draws. Tap for the full stats (step 20).
Share publicly
Puts the deck on the public deck pages, where others can see it, like it and comment. View public page opens that page.
The deck picture
The site draws it after you save. Save Image keeps it to post anywhere.
Build a deck
After + New Deck or Edit deck
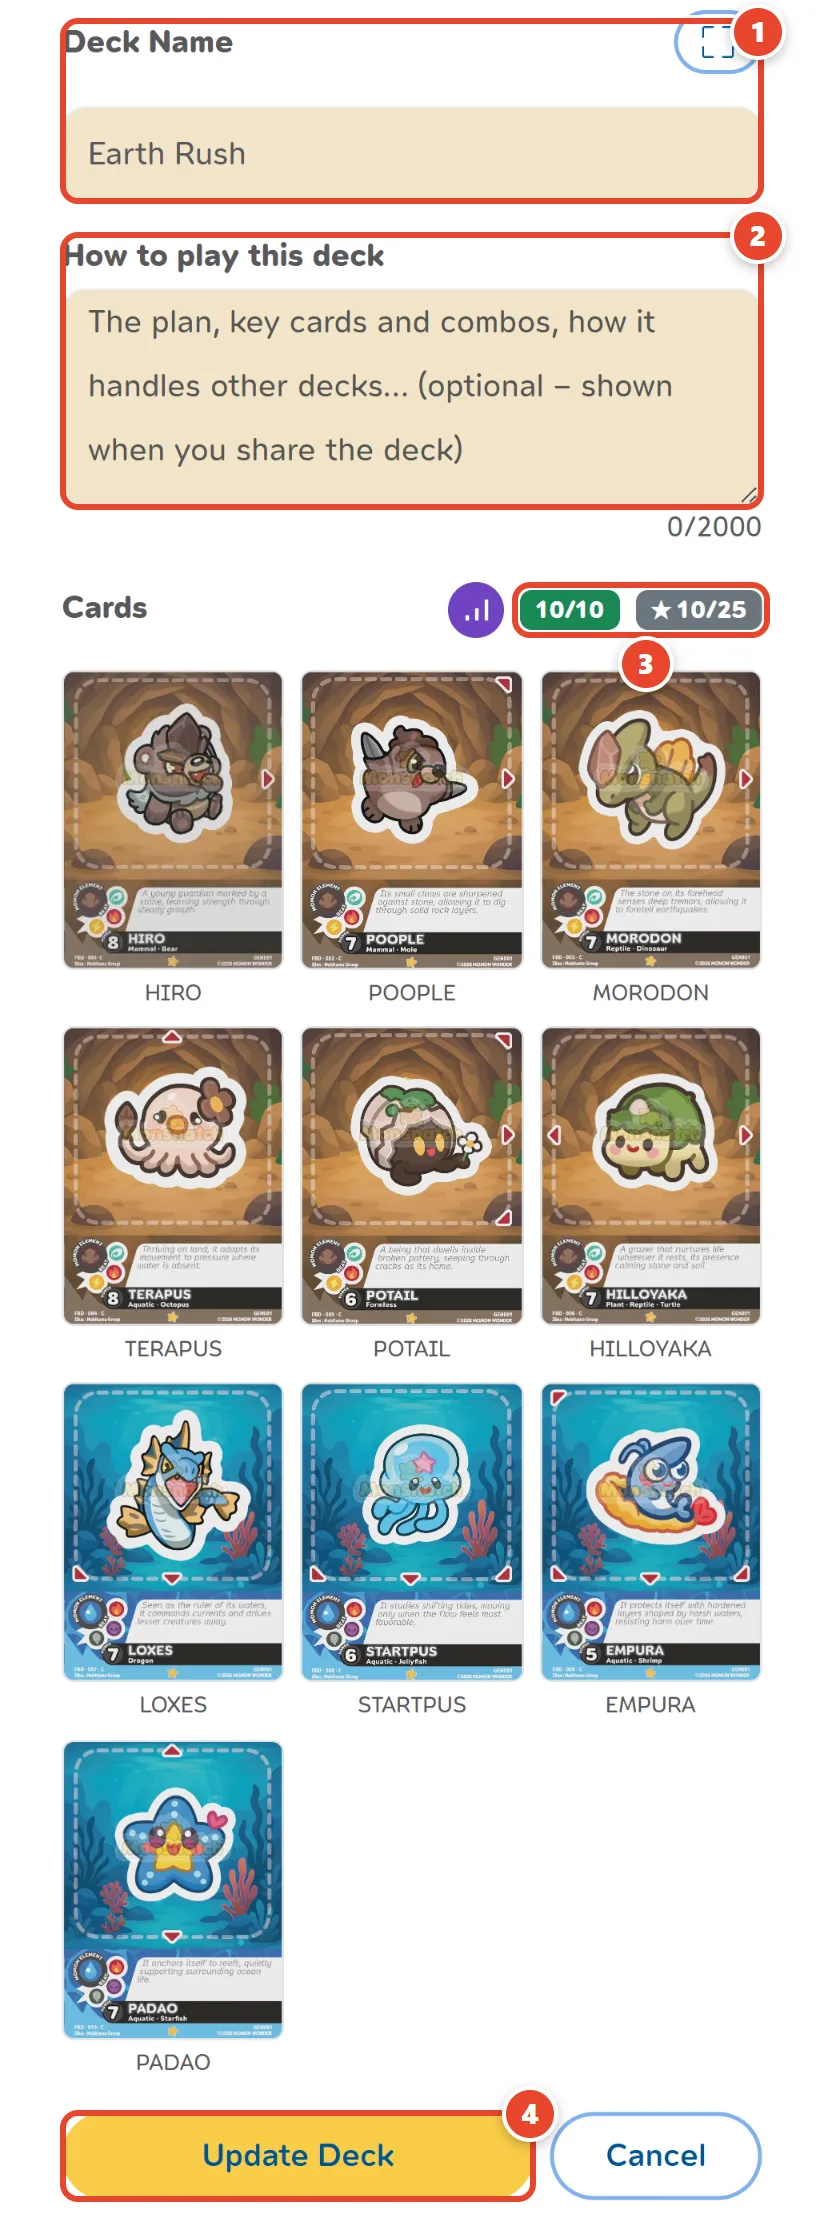
Deck Name
Name it so you can find it in the entry form.
How to play this deck
How to play it: the key cards, combos, what to watch for. Optional; shown on the deck's shared page.
Cards · Star Capacity
Cards in the deck out of 10, and the deck's Star Capacity out of 25. Over 25, the deck cannot be saved.
Update Deck
Saves the deck (Save Deck for a new one).
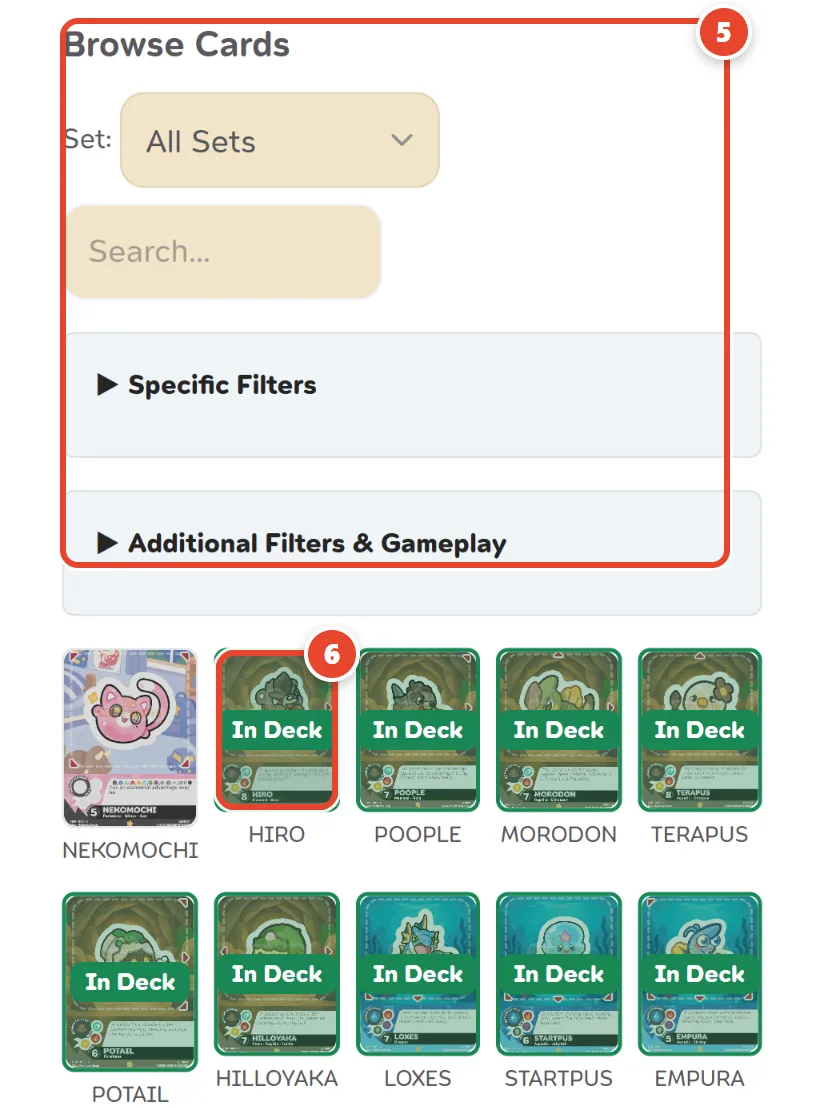
Browse Cards
The same set, search and filters as the card database.
Tap a card to add it
Cards already in the deck are marked In Deck.
My deck stats
My tournaments → See my deck stats, or your account menu
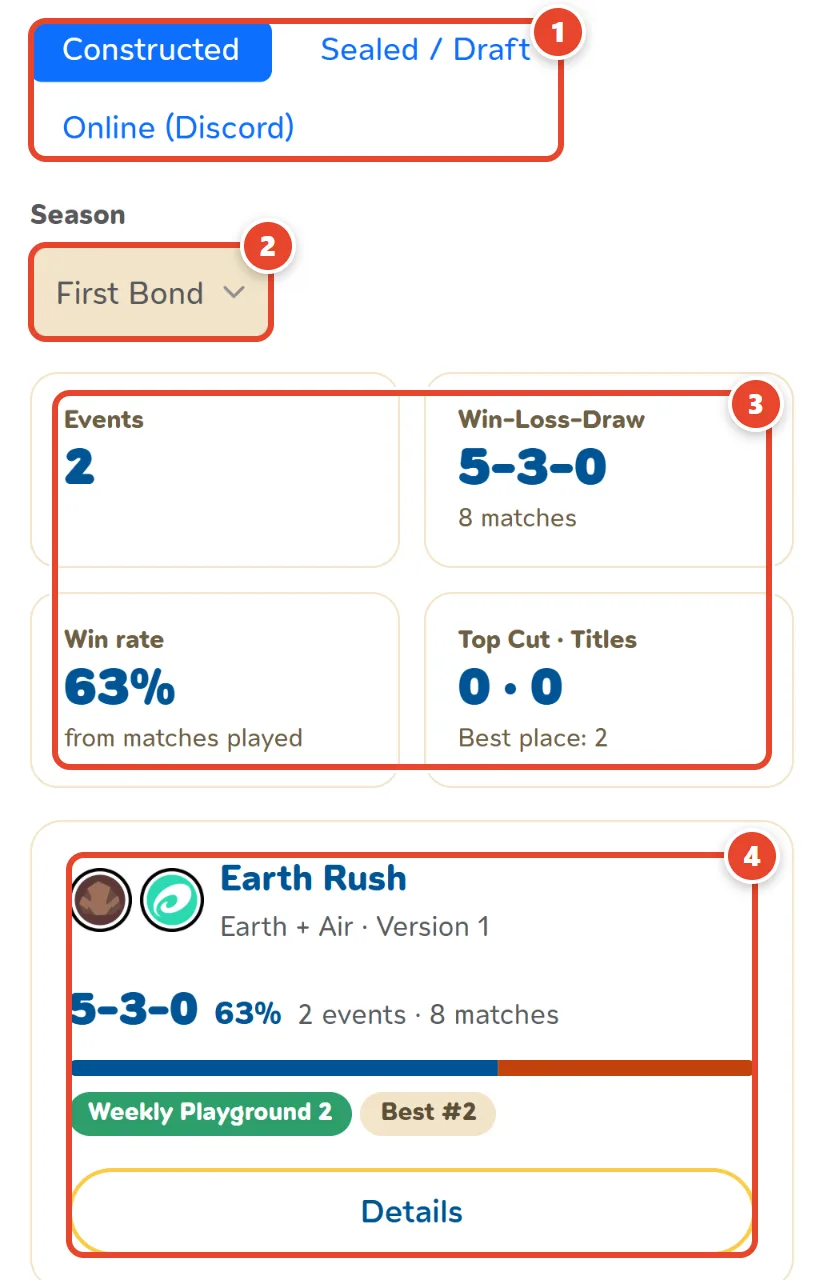
Constructed · Sealed / Draft · Online (Discord)
Your own decks; Sealed and Draft events; and games in the Discord game, which never count towards tournament stats.
Season
One season, or all of them.
The totals
Events, wins-losses-draws, win rate (from matches actually played, byes left out), Top Cuts, titles and your best place.
Each deck
Its record and the event levels it played. Details adds each level, each version of the deck and who it played against.
What counts
Only finished events; test and private events are left out.
My Binder
Account menu → My Binder
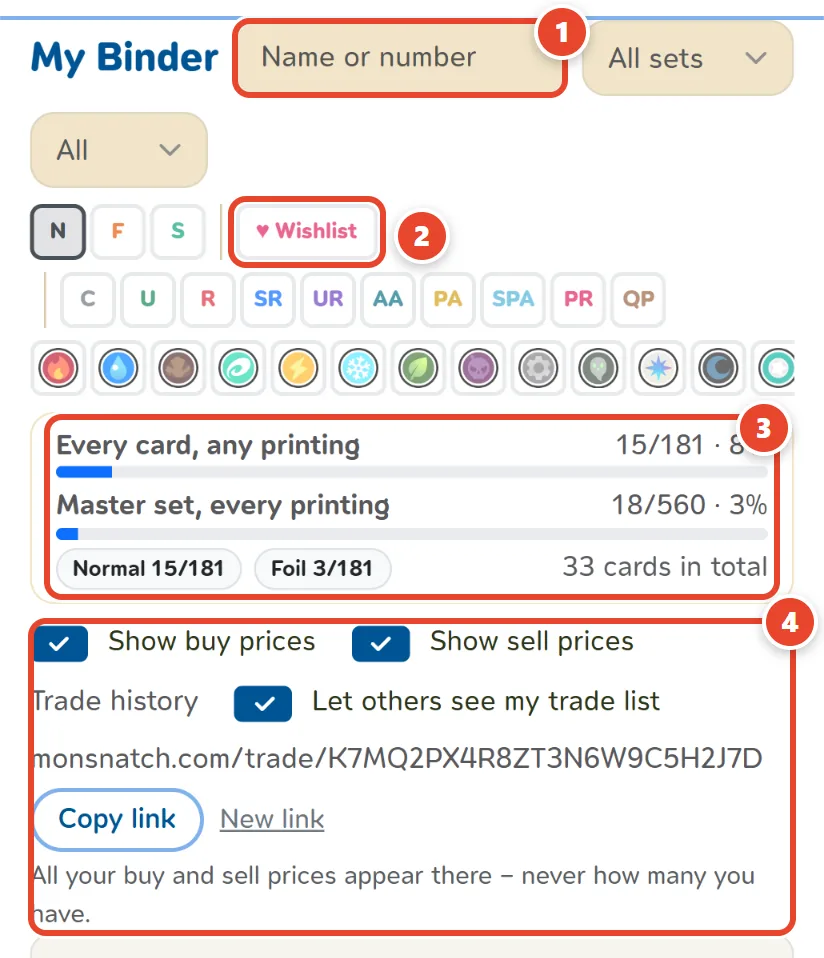
Search
By name or number and by set; show all cards, the ones you have, or the ones you are missing.
Filters · Wishlist
Printings (N normal, F foil, S sticker), rarity and element. Wishlist shows the cards you want.
How complete
Every card in any printing, every printing of every card, and how many copies you have in all.
Prices · Let others see my trade list
Show or hide your buy and sell prices, see Trade history, and share a link to your list. Others see your prices, never how many cards you have.
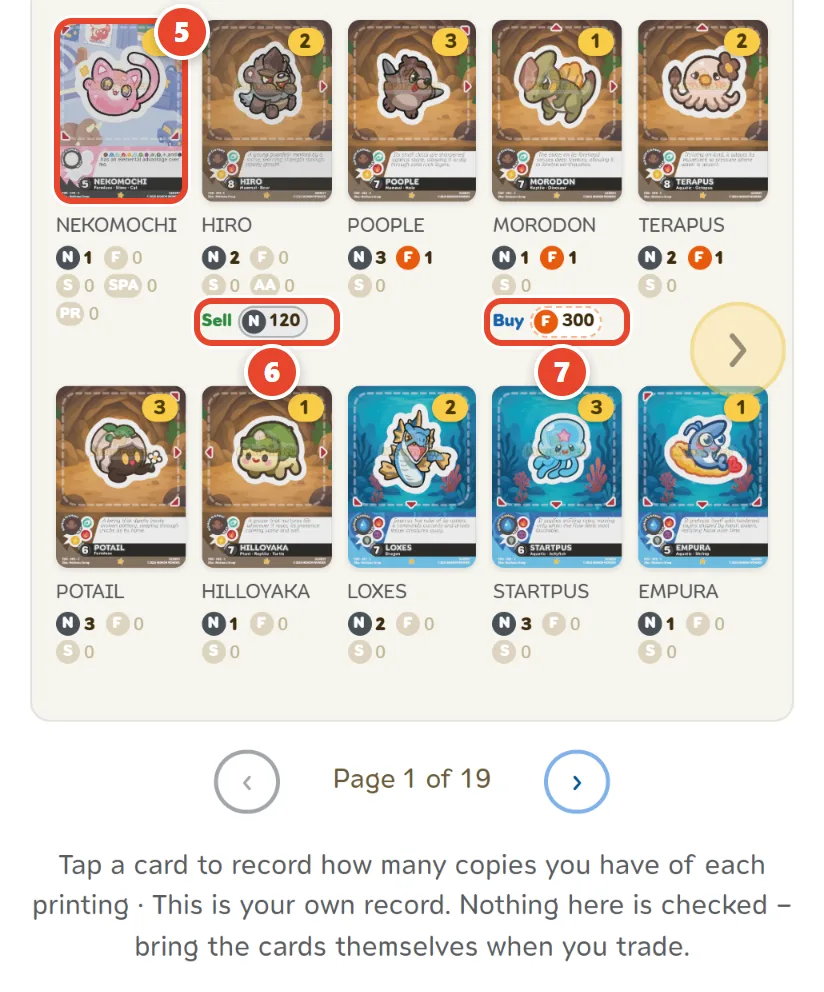
A card
Tap it to record how many of each printing you have. The number in the corner is your copies.
Sell
The price you sell it for, set in the card's window.
Buy
The price you would pay for it.
Your own record
Nobody checks it: bring the real cards when you trade.
Good to know
Small things that save a lot of trouble.
One account, signed in the same way
Signing in with Google one day and a new email the next makes two accounts, each with half your results. Link your other ways under Linked Accounts instead.
Your display name is what the shop calls out
Set Display Name before your first event, so the shop finds you in its list.
Stuck somewhere? Ask the Monsnatch team on Discord or our Facebook page.